Abandoned projects
obsolet unfinished
- Backup router configurations
- E-Mail Client für die Benutzung mit hMail einrichten
- CheckMK
- Introduction
- Installation
- Securing the webinterface
- checkmk Agent installation on linux
- Agent installation on TrueNAS
- SNMP Configuration for mikrotik routers
- Integration of Proxmox VE
- Monitoring of docker services
- Description of the machine
- Backup to USB Drive
- hCloud - Nextcloud
- Einführung
- File Access
- Sync Client
- Office integration
- Calendar CalDAV and adresses CardDAV
- Installation Sync Client unter Linux
- Registrierung
- Relax and recover
- PWM Password Management
- LDAP Account Manager
- Introduction
- Installation on Turnkey Debian
- Installation on Ubuntu Server 22.04
- Configuration of the LDAP Account Manager
- Supermicro SuperServer 743A
- Bacula
- NEVIS
- iRedMail
Backup router configurations
Introduction
Actually there are several other Autobackup ways on Mikrotik such as:
- Auto Backup Mikrotik Configuration with Script and Scheduler
Send Automatic Mikrotik Backup via Email
This Mikrotik tutorial describes, how to backup and export files that have been generated are uploaded to a folder on the FTP Server automatically and on a scheduled basis. So that the backup & export files uploaded to FTP will be neatly organized, easy to find, and fast to use.
Architecture overview

Send Backup Files to FTP Server Automatically
https://digiva.net/mikrotik-autobackup-send-backup-file-to-ftp-server-automatically/
Script to create backup files
Create user ftp_user on nas03.simmy.ch and link it to a home/ftp directory
create directory mikrotik in the ftp home directory
Go to the System menu –> Scripts –> Add a new script –> Name autobackup –> in the Source column, fill in:
/system backup save name=("BACKUP" . "-" . [/system identity get name] . "-" . \
[:pick [/system clock get date] 4 6] . [:pick [/system clock get date] 0 3] . [:pick [/system clock get date] 7 11]);
/export file=("BACKUP" . "-" . [/system identity get name] . "-" . \
[:pick [/system clock get date] 4 6] . [:pick [/system clock get date] 0 3] . [:pick [/system clock get date] 7 11]);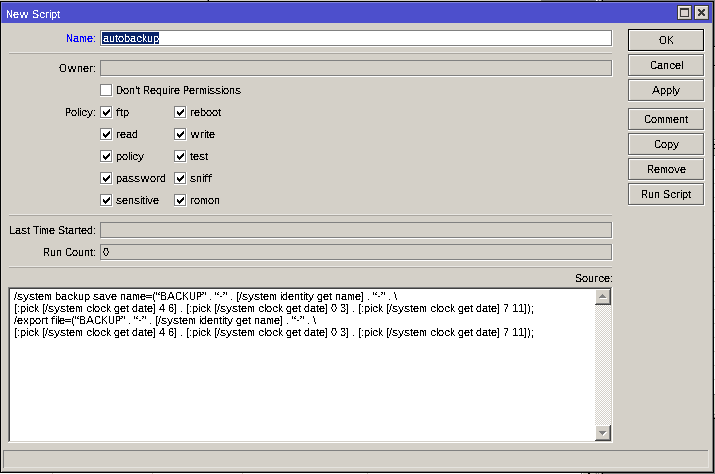
Script to upload backup Backup files to backup server
Go to the System menu –> Scripts –> Add a new script –> Name uploadbackup–> in the Source column, fill in:
:global backupname ("BACKUP" . "-" . [/system identity get name] . "-" . \
[:pick [/system clock get date] 4 6] . [:pick [/system clock get date] 0 3] . [:pick [/system clock get date] 7 11] . ".backup");
/tool fetch address=nas03.simmy.ch mode=ftp user=ftp_user password=<super-secret-password> src-path=$backupname dst-path="mikrotik/$backupname" upload=yesOr create one script:
:global backupname ("BACKUP" . "-" . [/system identity get name] . "-" . \
[:pick [/system clock get date] 4 6] . [:pick [/system clock get date] 0 3] . [:pick [/system clock get date] 7 11] . ".backup");
/tool fetch address=nas03.simmy.ch mode=ftp user=ftp_user password=<super-secret-password> src-path=$backupname dst-path="mikrotik/$backupname" upload=yes
:global backupname ("BACKUP" . "-" . [/system identity get name] . "-" . \
[:pick [/system clock get date] 4 6] . [:pick [/system clock get date] 0 3] . [:pick [/system clock get date] 7 11] . ".rsc");
/tool fetch address=nas03.simmy.ch mode=ftp user=ftp_user password=<super-secret-password> src-path=$backupname dst-path="mikrotik/$backupname" upload=yes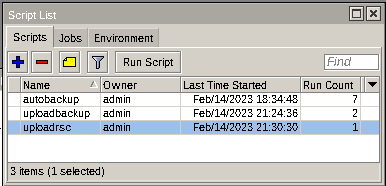
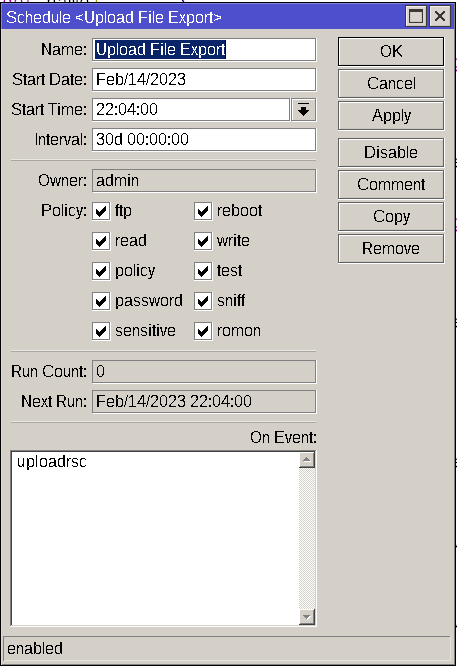
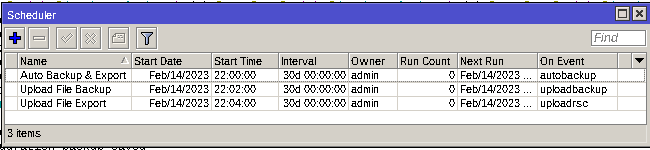
Schedule the scripts
|
|
|
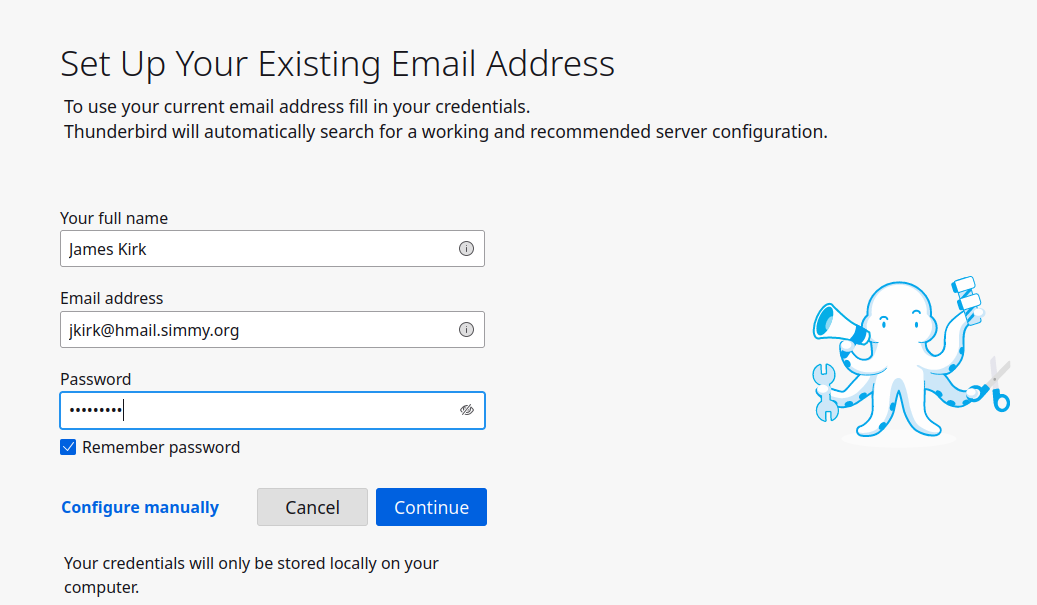
E-Mail Client für die Benutzung mit hMail einrichten
Im Augenblick deaktiviert.
Einleitung
Fast alle modernen E-Mail Clients sind kompatibel mit hMail. Hier eine kleine Auswahl an gängigen Clients:
- Thunderbid
- MS Outlook
- Evolution
Als Beispiel verwende ich hier Thunderbird. Andere Clients sind analoog zum Zugriff auf hMail zu konfigurieren. Daneben werden noch zwei WebClients zur freien Benutzung angeboten:
- RoundCube
- SOGo
Konfiguration Thunderbird
- Nach dem Start von Thunderbird links unten auf das Einrichtungs-Icon klicken:

- Dann auf Account Settings:

- Dann auf Account Actions:

- Add Mail Account

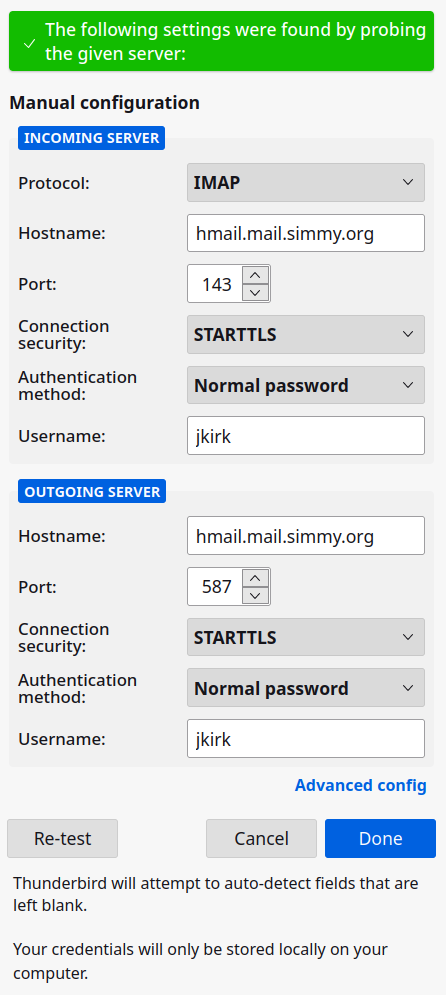
- Configure Manually

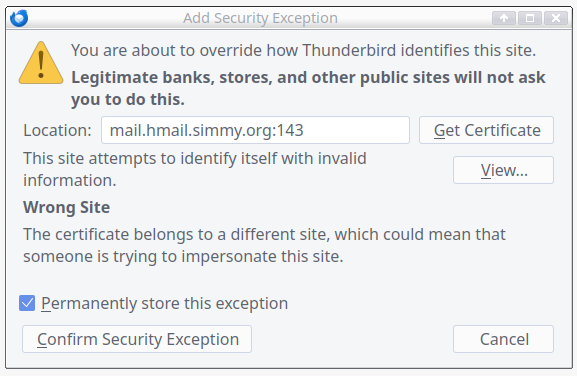
- Confirm Security Exception

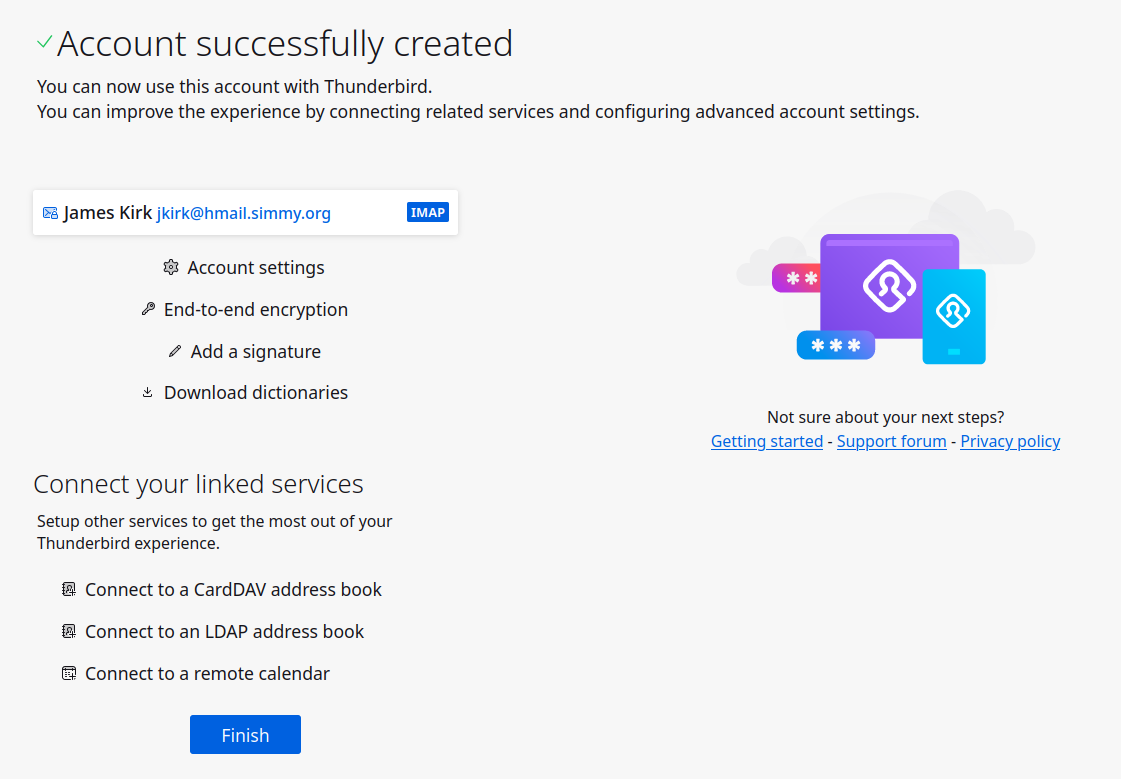
- Alles ok:


CheckMK
Monitoring Software
Introduction
![]()
Introduction
Checkmk is a comprehensive solution for monitoring of applications, servers, and networks. This vast set of features was designed in collaboration with our customers over many years. Checkmk is easy to learn and use, but powerful enough for the most complex IT environments.
Checkmk is available in four editions:
- an open source edition (Checkmk Raw Edition)
- a commercial enterprise-grade edition (Checkmk Enterprise Edition)
- a commercial edition with advanced cloud monitoring features (Checkmk Cloud Edition)
- an edition for managed services providers (Checkmk Managed Services Edition)
These Checkmk Editions are available for a range of platforms, in particular for various versions of Debian, Ubuntu, SLES and Red Hat, and also as a Docker Image. In addition, physical appliances of various sizes as well as a virtual appliance are offered to simplify the administration of the underlying operating system through a graphical user interface and to enable high-availability solutions.
The agents used by Checkmk to collect data are available for 11 platforms, including Windows.
This manual describes the installation on portainer.
Features
- Monitoring
- Highly automated
- Massively scalable
- Extensible
checkmk provides integrations for important products, such as:
- Proxmox
- Linux
- Apache
- MikroTik
- Dell
- Qnap
- docker
Requirements
- Ubuntu Server 22.04 LTS
- Apache
- ssh
History
I installed the "free" enterprise edition, however, after 30 days it is not so free after all. The amount of hosts is limited to 25. After I enabled another feature, it counted PVE subsystems as hosts and the host count was suddenly 59. The whole suite stopped working. Therefore it is necessary to install it again. This time I will use the raw edition on portainer.
Installation
Installation on Linux
Download
You can download the current version here:
After selecting the desired version it will create a command. Copy the command and execute in a Linux terminal. It looks like this:
wget https://download.checkmk.com/checkmk/2.2.0p20/check-mk-raw-2.2.0p20_0.bookworm_amd64.debInstallation
copy the command from the webpage and execute in a Linux terminal
sudo apt install ./check-mk-raw-2.2.0p17_0.bookworm_amd64.debCreate a checkmk monitoring site
sudo omd create monitoringThe output will look like this:
Output
Adding /opt/omd/sites/monitoring/tmp to /etc/fstab.
Creating temporary filesystem /omd/sites/monitoring/tmp...OK
Restarting Apache...OK
Created new site monitoring with version 2.2.0p17.cre.
The site can be started with omd start monitoring.
The default web UI is available at http://your_server/monitoring/
The admin user for the web applications is cmkadmin with password: generated-password
(It can be changed with 'htpasswd -m ~/etc/htpasswd cmkadmin' as site user.)
Please do a su - monitoring for administration of this site. Grab the password and change it.
omd start monitoringInstallation on Portainer
I grabbed a nice cocker compose file, created a new stack and copied the contents of the docker compose file.
version: '3.1'
services:
controll:
image: checkmk/check-mk-raw:2.0.0-latest
tmpfs:
- /opt/omd/sites/cmk/tmp:uid=1000,gid=1000
ulimits:
nofile: 1024
container_name: checkmk
restart: always
volumes:
- '/etc/localtime:/etc/localtime:ro'
- './odm-sites:/omd/sites'
ports:
- '8095:5000'
- '6557:6557'The password can be seen in the log (Quick actions). And the password can be changed on the console (Quick actions).
htpasswd /opt/omd/sites/cmk/etc/htpasswd cmkadminYou can login here:
http://portainer.simmy.ch:8095
Securing the webinterface
So far I couldn't make that working.
Useful link
Docs: Securing the Webinterface
Activating the Apache modules
a2enmod ssl
systemctl restart apache2locate the certificate file:
find /etc/apache2/ -type f -exec grep -Hn '^\s*SSLCertificate.*File' {} \;/etc/apache2/sites-enabled/000-default
RewriteEngine On
# Never forward request for .well-known (important when using Let's Encrypt)
RewriteCond %{REQUEST_URI} !^/.well-known
# Next 2 lines: Force redirection if incoming request is not on 443
RewriteCond %{SERVER_PORT} !^443$
RewriteRule (.*) https://%{HTTP_HOST}$1 [L]
# This section passes the system Apaches connection mode to the
# instance Apache. Make sure mod_headers is enabled, otherwise it
# will be ignored and "Analyze configuration" will issue "WARN".
<IfModule headers_module>
RequestHeader set X-Forwarded-Proto expr=%{REQUEST_SCHEME}
RequestHeader set X-Forwarded-SSL expr=%{HTTPS}
</IfModule>checkmk Agent installation on linux
Download the Agent
Setup --> Agents --> "Windows, Linux, Solaris, AIX" --> Related --> "Linux, Solaris, AIX" --> right click on the file --> Copy link address
Install the Agent
For Debian based systems
wget http://syslog.simmy.ch/monitoring2/check_mk/agents/check-mk-agent_2.2.0p17-1_all.deb
apt install ./check-mk-agent_2.2.0p17-1_all.debif ufw is active, then you have to enable the service port:
ufw allow 6556For Red Hat/Fedora based systems
wget http://syslog.simmy.ch/monitoring2/check_mk/agents/check-mk-agent-2.2.0p17-1.noarch.rpm
sudo yum install -y -q check-mk-agent-2.2.0p17-1.noarch.rpm -yOpen the firewall for checkmk-agent on port 6556
For Univention based systems
Installationsanleitung checkmk 2.0 check_mk_agent auf UCS 5.0
Register agent to the monitoring server
cmk-agent-ctl register --hostname $(hostname -f) --server syslog.simmy.ch --site monitoring2 --user cmkadminUseful commands
ss -tulpn | grep 6556
echo | nc <localhost> 6556
cmk-agent-ctl statusAgent installation on TrueNAS
Download the Agent
Setup --> Agents --> "Windows, Linux, Solaris, AIX" --> Related --> "Linux, Solaris, AIX" --> right click on .deb file --> Copy link address
Then you will have the address of the .deb file, which can be downloaded with wget:
wget http://syslog.simmy.ch/monitoring2/check_mk/agents/check-mk-agent_2.2.0p17-1_all.debInstall the Agent
For some reason the apt program is not an executable. So the first step is to make this file executable.
chmod +x /usr/bin/apt
apt install ./check-mk-agent_2.2.0p17-1_all.debif ufw is active, then you have to enable the service port:
ufw allow 6556Register agent to the monitoring server
cmk-agent-ctl register --hostname $HOSTNAME.simmy.ch --server syslog.simmy.ch --site monitoring2 --user cmkadminUseful commands
ss -tulpn | grep 6556
echo | nc <localhost> 6556
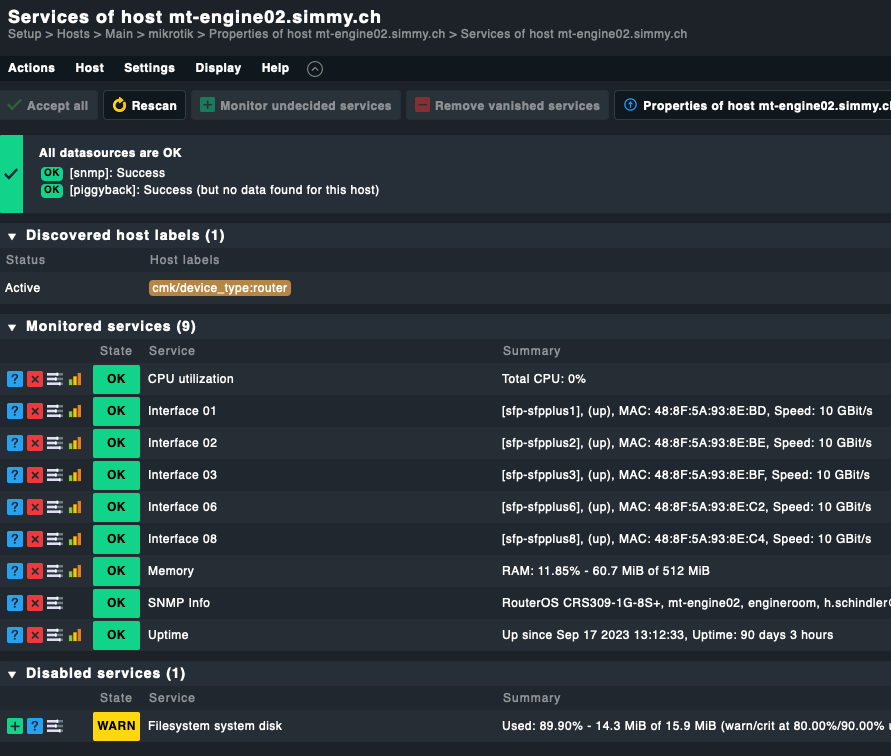
cmk-agent-ctl statusSNMP Configuration for mikrotik routers
Configuration on mikrotik
IP --> SNMP --> Communities
Create community simmy with high encryption
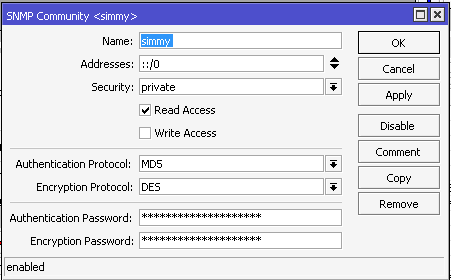
Enable and select the trap community
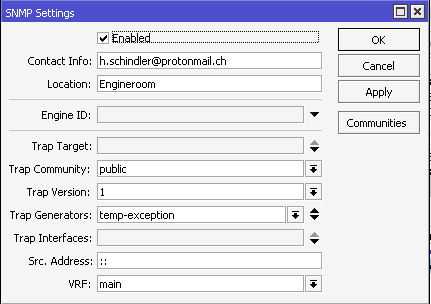
Configuration on checkmk
I created a folder for all mikrotik devices.
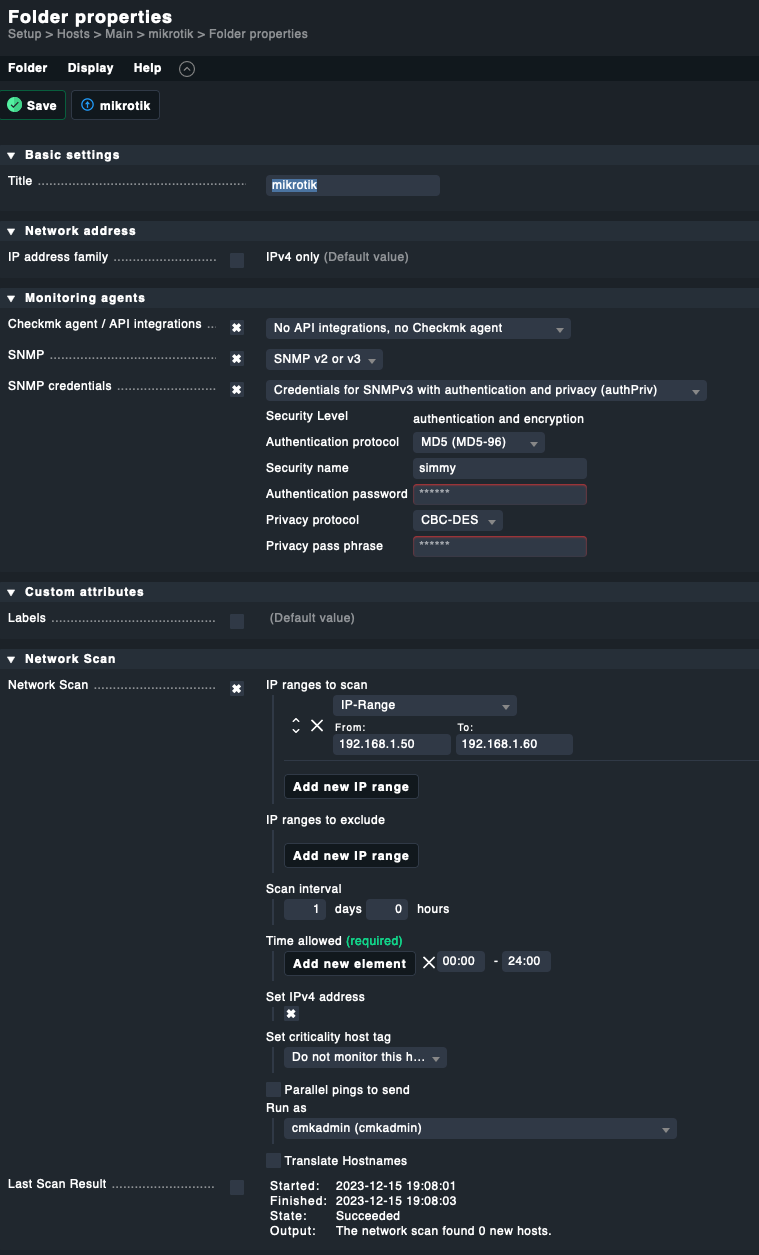
Use the same community and passwords as above!
For the network scan I limited the IP-Range to the range where all mikrotik devices have their IP address.
On most of the devices I disabled the "Filesystem system disk" check, hence it would always trigger an alarm on the mikrotik defaults.
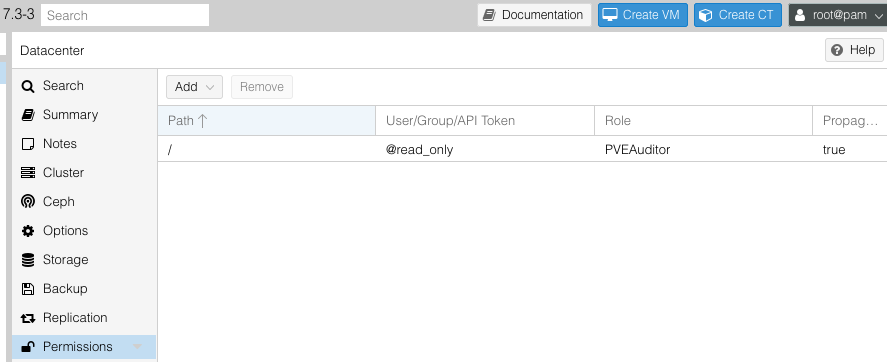
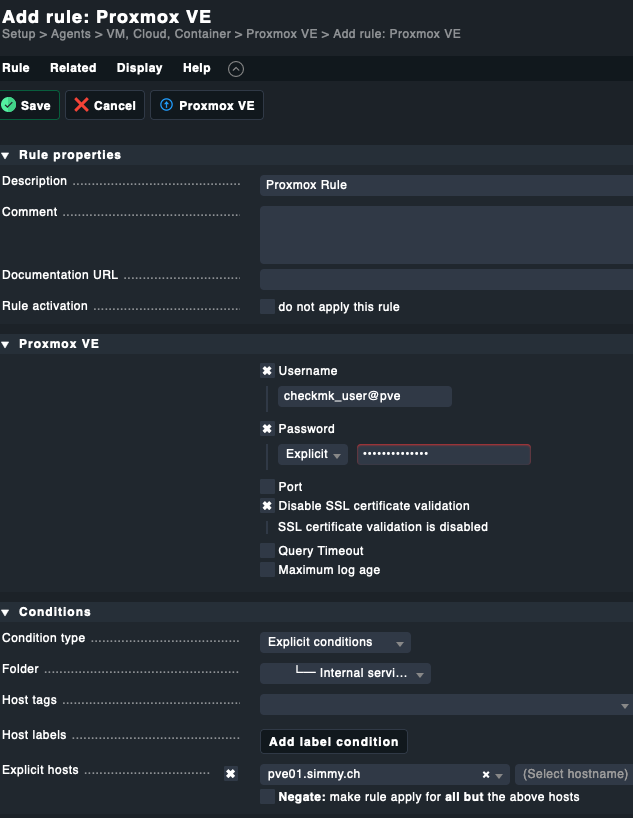
Integration of Proxmox VE
Configuration on Proxmox VE
Create a group named read_only.
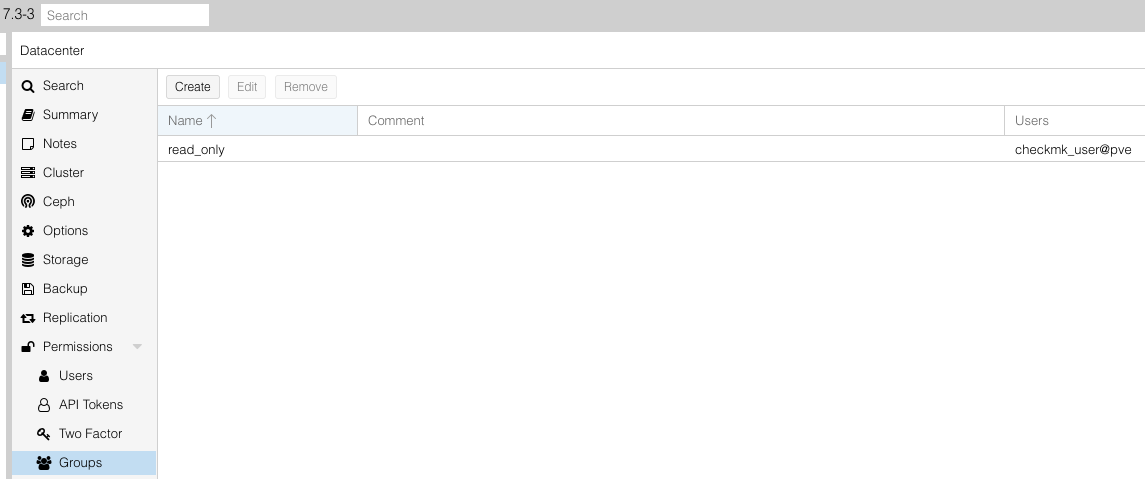
Create a user named checkmk_user and add it to the group read_only.
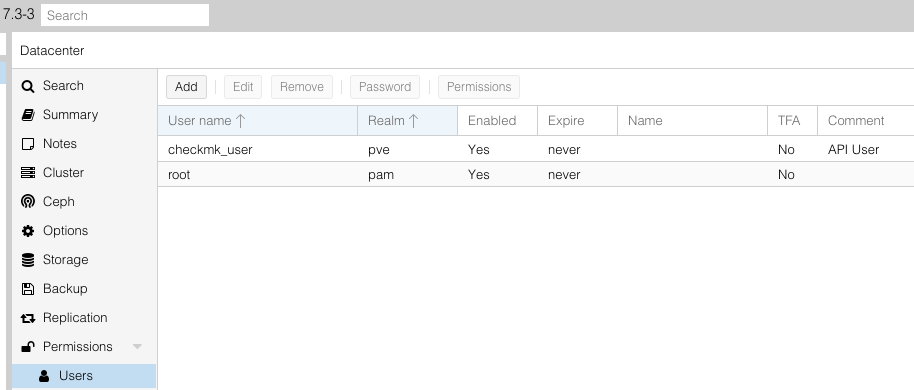
Add a group Permission:
Install the Linux client.
Configuration on checkmk
Setup --> Hosts --> find and select properties of host
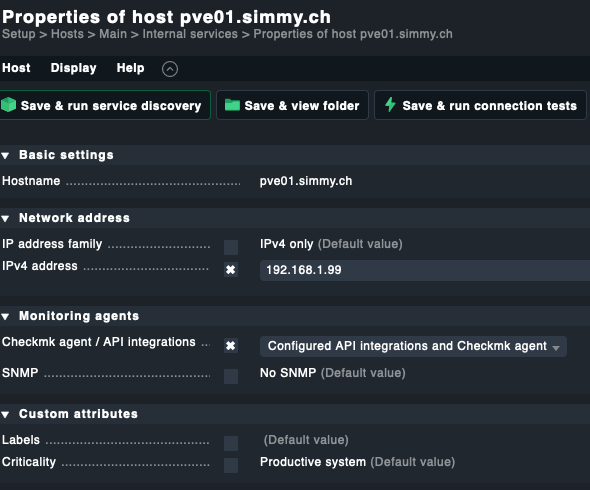
Setup --> Agents --> VM, Cloud, Container --> Proxmox VE --> Add rule
Useful links
https://docs.checkmk.com/latest/en/
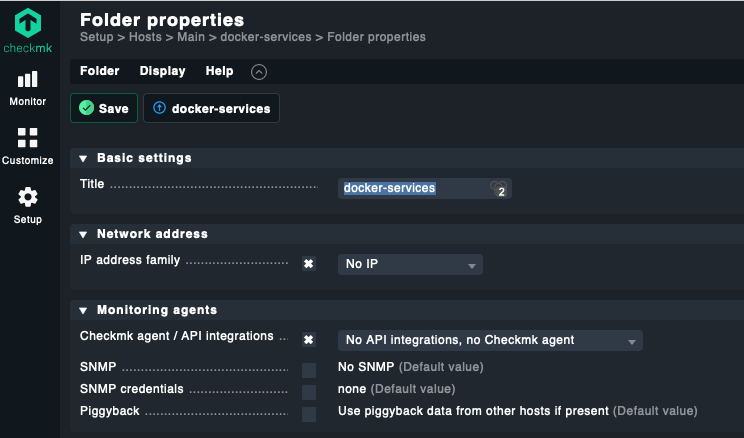
Monitoring of docker services
Configuration
A very good description can be found here:
Install the agent
You will need the mk_docker.py agent plug-in, which you can find here: Setup > Agents > Other operating systems > Plugins
wget http://syslog.simmy.ch/monitoring2/check_mk/agents/plugins/mk_docker.pyInstall the plug-in to the agent’s plug-in folder (usually /usr/lib/check_mk_agent/plugins).
install -m 0755 mk_docker.py /usr/lib/check_mk_agent/pluginscreate the config file
Create the configuration file /etc/check_mk/docker.cfg on the Docker host. A template with detailed explanations can be found in the Checkmk directory ~/share/check_mk/agents/cfg_examples/docker.cfg.
# Copyright (C) 2019 tribe29 GmbH - License: GNU General Public License v2
# This file is part of Checkmk (https://checkmk.com). It is subject to the terms and
# conditions defined in the file COPYING, which is part of this source code package.
# This is an exaple configuration file for the plugin
#
# mk_docker.py
#
# It is designed to give you an impression of available
# options. The specific choice in this file is a valid setup,
# but probably not suitable for your use case.
# If you intend to run the plugin with the default options,
# you do not need any configuration file at all.
# You must specify one section of the name DOCKER (additional sections are ignored).
[DOCKER]
# SELECTION OF AGENT SECTIONS (SERVICES) TO CREATE
# If some of the sections take too long to run, and you don't need them, you
# can disable them by specifying a comma separated list (Default: empty string
# - run all sections). To disable the sections <<<docker_node_disk_usage>>>
# and <<<docker_node_images>>>, for example, provide:
skip_sections: docker_node_disk_usage,docker_node_images
# You may skip any of the following sections:
# * docker_node_disk_usage: get df like info of disk usage (may take long)
# * docker_node_images: get detailed information on all images and containers
# (for HW/SW inventory)
# * docker_node_network: get network information
# The following sections send piggyback information to monitored containers:
# * docker_container_node_name: display nodes name on container
# * docker_container_status: container status/health according to docker health API
# * docker_container_labels: containers labels
# * docker_container_network: containers network configuration
# * docker_container_agent: retrieve information by running the
# check_mk_agent inside the container
# If no agent was installed on the container:
# * docker_container_mem: container memory stats
# * docker_container_cpu: container cpu utilization
# * docker_container_diskstat container disk stats
# CONTAINER ID
# You can choose what to use as the container identifier. This will
# affect the name used for the piggyback host corresponding to the
# container, as well as items for services created on the node for each
# container.
# By default, the identifier is assumed to be the first 12 characters
# of the container UUID. You can choose to use the full ID or the containers
# name instead. Allowed values are "short" (the default), "long" and "name".
container_id: name
# BASE URL
# By default we are trying to connect to the docker API engine
# via the unix socket:
base_url: unix://var/run/docker.sock
Settings in the GUI
In addition I created a folder with the name docker-services:
I had to add hosts with the names of the docker containers.
That's all.
Description of the machine
Hardware
OS
MX Linux 23.2 Libretto fluxbox based on Debian Linux 12 bookworm
Configuration
Installation
Straight forward using these settings:
- Keyboard German
- encrypted disk with password
- filesystem btrfs
- disk with swap partition
Added Software
- VNC Server
The Desktop can be remotely controlled by either VNC or IPMI (HTML5, MegaRAC)
Install VNC on Manjaro
Installation of VNC Server on MX Linux - SSH server
- Bitwarden
- conky (not really necessary)
Tweaks
join the sync queue of Firefox for the favorites
misc
default file manager Thunar
Add pci=noaer to the default Kernel parameter in the grub configuration
USB Drive mounting
This is not yet finally. When one of those drives is not available, the system will hang at system start.
I created two mount points:
- /mnt/lacie
- /mnt/armorlock
https://linuxconfig.org/automatically-mount-usb-external-drive-with-autofs
I added these two lines to /etc/fstab:
UUID=A9B7-5D47 /mnt/armorlock exfat auto,nofail,rw,relatime,fmask=0022,dmask=0022,iocharset=utf8,errors=remount-ro 0 0
UUID=FFDF-F997 /mnt/lacie exfat auto,nofail,rw,relatime,fmask=0022,dmask=0022,iocharset=utf8,errors=remount-ro 0 0Then I executed these commands:
systemctl daemon-reload
mount -aDescription of networking
This machine uses altogether 4 network interfaces:
Backup to USB Drive
Introduction
For same applications it might be necessary to use an external drive without adding this drive to a ZPool. E.g. if you want to copy from or to an external device. TrueNAS did not play well with this USB Bavkup solution. So finally I created another Hardware with a Linux client OS (MXLinux) to get the job dons.
Setup / mounting
TrueNAS will not mount a drive automatically when plugged into an USB Port. This has to be done manually. In this example I will use an external drive from LaCie.
- Plug in the drive to any USB Port
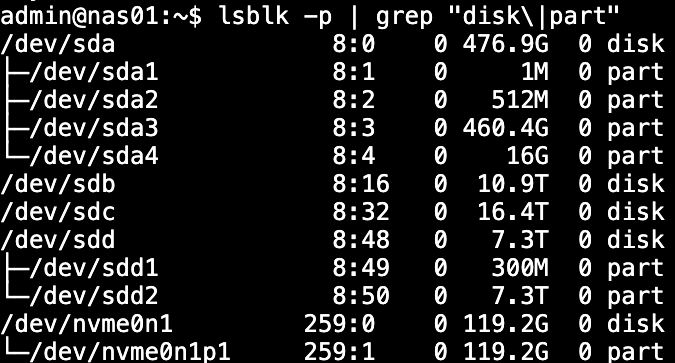
- Figure out the name of the device. It can be seen in Storage --> Disks. It is usually the drive without pool.
- Enter
It will show show the exact name of the partition you want to mount.lsblk -p | grep "disk\|part"
In this case it is sdd2. - Enter
blkid /dev/sdd2
It will show you the UUID of the partition you want to mount
root@nas04[/home/admin]# blkid /dev/sdd2 /dev/sdd2: LABEL_FATBOOT="EFI" LABEL="EFI" UUID="B7D1-A689" BLOCK_SIZE="512" TYPE="vfat" PARTUUID="5545caa6-b0c3-4558-b222-aac5fb9c0026" - Create a mountpoint
mkdir /mnt/LaCie - add to fstab
UUID=B7D1-A689 /mnt/LaCie vfat rw,relatime,fmask=0022,dmask=0022,codepage=437,iocharset=iso8859-1,shortname=mixed,errors=remount-ro 0 0 - Mount the device
mount -a
Explanation
It seems to be awkward to make so many steps to mount an USB device. However, TrueNAS does no auto mount. So a permanent mount must be added manually to the fstab. And furthermore, TrueNAS seems to change the name of the partition frequently, so the UUID of the partition has to be used.
Create an rsync job
Create the file /root/rsync_exclude.txt with this content:
ix-applications
replika
.~tmp~
*/._*
*/.DocumentRevisions-V100/
*/.DS_Store
*/.fseventsd/
*/.Spotlight-V100/
*/.TemporaryItems/
*/.Trashes/
.@*
.*
@Recycle
*.@__thumb
sync.ffs_lockAll these files/directories will not be copied to the target drive. These items are created by MacOS and will automaticall re-created, when these objects in the backup are used by MacOS.
The command for the rsync job looks like this:
rsync -av --delete --log-file="/var/log/rsyncd.LaCie.log" --no-perms --no-owner --no-group --exclude-from "/root/rsync_exclude.txt" /mnt/N4pool/ /mnt/LaCie/backup If you want to run it over the network:
create a passwordless ssh connection
Enable ssh login with a public key
rsync -av --delete --log-file="/var/log/rsyncd.LaCie.log" --no-perms --no-owner --no-group --exclude-from "/root/rsync_exclude.txt" rsync@nas04.simmy.ch:/mnt/N4pool/ /mnt/lacie/backup Add to cron
sudo crontab -e# Edit this file to introduce tasks to be run by cron.
#
# Each task to run has to be defined through a single line
# indicating with different fields when the task will be run
# and what command to run for the task
#
# To define the time you can provide concrete values for
# minute (m), hour (h), day of month (dom), month (mon),
# and day of week (dow) or use '*' in these fields (for 'any').
#
# Notice that tasks will be started based on the cron's system
# daemon's notion of time and timezones.
#
# Output of the crontab jobs (including errors) is sent through
# email to the user the crontab file belongs to (unless redirected).
#
# For example, you can run a backup of all your user accounts
# at 5 a.m every week with:
# 0 5 * * 1 tar -zcf /var/backups/home.tgz /home/
#
# For more information see the manual pages of crontab(5) and cron(8)
#
# m h dom mon dow command
0 1 * * * /root/nas04_backup.sh
0 3 * * * /root/hcloud_backup.sh
0 1 * * * /root/dyndns.sh
0 4 * * * /root/hcloud2_backup.shJob descriptions
Currently therea are four jobs executed:
| Job |
description |
| nas04_backup.sh | Backup all data in unencrypted from nas04 to external USB Drive |
| hcloud_backup.sh | old unencrypted backup of hCloud |
| hcloud2_backup.sh | backup from hCloud on nas02 to encrypted exteranal usb drive |
| dyndns.sh | Update for hosting.de DynDNS service |
hcloud2_backup.sh
The data is located on nas02.simmy.ch in an encrypted dataset. rsyncd is installed and configured on nas02.simmy.ch. This docker container is not listening on port 22, but on port 30026. Therefore it was necessary to modify the rsync job:
rsync -av --delete --log-file="/var/log/rsyncd.armorlock2.log" --no-perms --no-owner --no-group --exclude-from "/root/rsync_exclude.txt" rsync://nas02.simmy.ch:30026/hcloud_simmy /mnt/armorlock/backup/hcloud2Useful links
Manually mount a USB drive in the Linux terminal
How To Use Rsync to Sync Local and Remote Directories
How to use UUID to mount a volume
hCloud - Nextcloud
Einführung
Definition
Nextcloud ist eine freie Software für das Speichern von Daten (z. B. Dateien, Kalendern, Kontakten etc.) auf einem privaten Server. Auf die Daten kann der Anwender sowohl über eine Weboberfläche als auch mit Client-Applikationen (Smartphone und Desktop) zugreifen. Server und Clients können sich dabei synchronisieren. Nextcloud ermöglicht dem Anwender dadurch, auf einen zentralen und konsistenten Datenbestand von vielen Endgeräten aus zuzugreifen und diesen mit anderen Anwendern optional zu teilen. Neben der Datenhaltung bietet Nextcloud Funktionalitäten für Videokonferenzen und verschiedene Office-Applikationen über die Weboberfläche.
Funktionen
Basisfunktionen
- Benutzer-, Gruppen- und Rechteverwaltung (erweiterbar, zum Beispiel zur Authentifizierung mit LDAP)
- Passwort-Richtlinien
- Brute-Force-Schutz
- Monitoring (Web/API)-Schnittstelle
- Integration mit Windows-Netzfreigaben (SMB/CIFS), externen Speicher mit Swift, FTP/SFTP, WebDAV, Amazon S3, Google Drive, Microsoft Azure und Dropbox
- Videokonferenz über Nextcloud-Talk
- Bildschirmfreigabe über Nextcloud-Talk
- Verschlüsselung der Daten auf dem Server sowie eine verschlüsselte Übertragung per SSL/TLS
- Teilen von Dateien und Ordnern mit anderen Benutzern, Gruppen oder über öffentliche URLs
- Anonymes Hochladen (Kein Benutzerkonto erforderlich)
- Integration von Collabora Online, einer auf LibreOffice basierenden Online-Office-Applikation
- Integration von OnlyOffice
- Betrachter für PDF- und Microsoft-Office-Dateien
- Volltextsuche
- Anpassen des Erscheinungsbilds (Theming)
- Zwei-Faktor-Authentifizierung
Plugins
Da die Software modular aufgebaut ist, lässt sie sich durch ein Plugin-System um beliebige Funktionalitäten erweitern.
- Kalender (auch als CalDAV), Adressbuch (auch als CardDAV)
- E-Mail-Programm
- Feedreader und Lesezeichenverwaltung
- Texterkennung für Bilder und PDF-Dateien (Nutzung von Tesseract), Kollaboration (Kommentare zu Dateien, Verschlagwortung)
- Aktivitätenanzeige und Umsetzung der Anforderungen der Datenschutz-Grundverordnung (DSGVO)
- Musik- und Videowiedergabe und hören von Internetradio
- Aufgabenplaner (To-Do-Listen), Erstellen von Mindmaps, Erstellen von Diagrammen (u. a. Netzwerk, Ablaufdiagramme, Geschäftsprozesse, UML), Kanban-Projektmanagement
- Integration von Content-Management-Systemen (u. a. Pico-CMS), Webanalytik (Nutzung von Piwik/Matomo)
- Bearbeiten von Textdateien mit Unterstützung für Markdown und WYSIWYG-Editor für Textdateien inkl. Markdown-Unterstützung
- Auswerten von Geodaten im GPS Exchange Format
- Betrachter für Wettervorhersagen, Digital Imaging and Communications in Medicine und Karten (Kartografie)
- Fotogalerie oder Verwaltung von Kochrezepten
Grundsätzlich gibt es verschiedene Apps in verschiedenen Kategorien, z. B. Dateien, Spiele, Überwachung, Multimedia, Organisation, Sicherheit und Kommunikation.
File Access
Introduction
There are basically three different ways to get access to files stored on the Nextcloud:
- WebDAV (davs://hcloud.simmy.org/remote.php/dav/files/yourName/)
- Login to the Nextcloud with the web GUI (https:/hcloud.simmy.org)
- Use the sync client and access like local files
WebDAV will only work if an appropriate client is already installed.
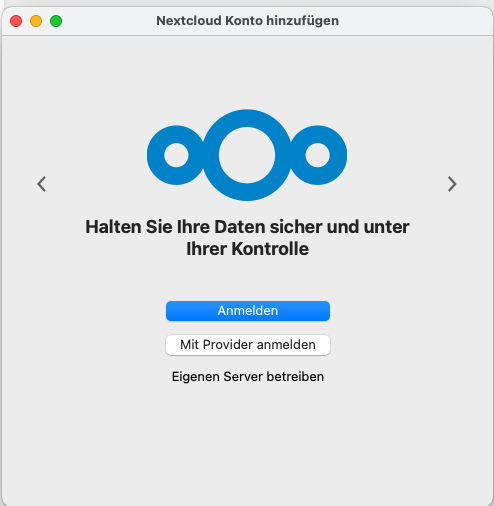
Sync Client
Introduction
A very useful and highly recommended feature is the file sync client of Nextcloud. This client offers a seamless integration of your Nextcloud files in your local favorite file manager. You can work with these files as if they were stored on your local machine.
Download the installation file
If you logon to the Nextcloud, go to your Profile and then click on Mobile & Desktop.

Click on "Desktop app".
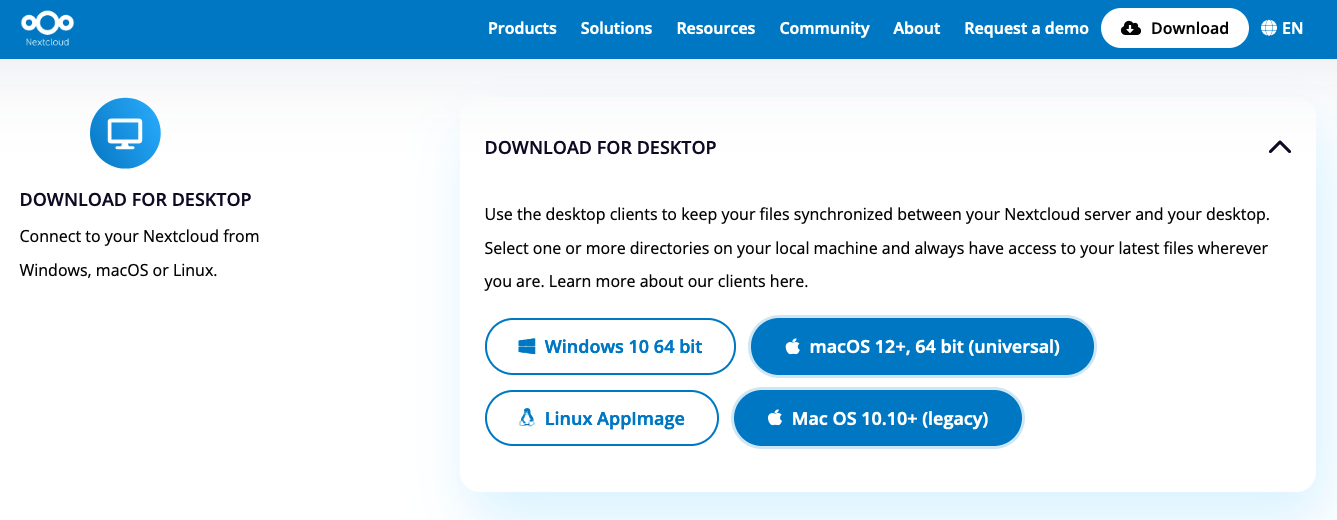
Select your installation file by clicking on it. It will download automatically to your machine. After that you have to click on it to execute.
Follow the easy and simple setup.
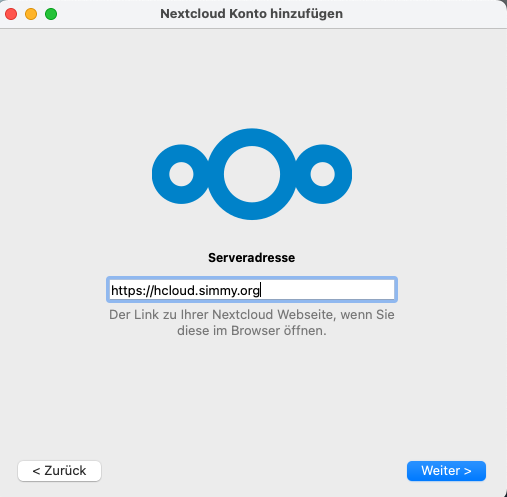
Configuration of sync
After a successful installation you can configure the sync.
Establish access to the Nextcloud server
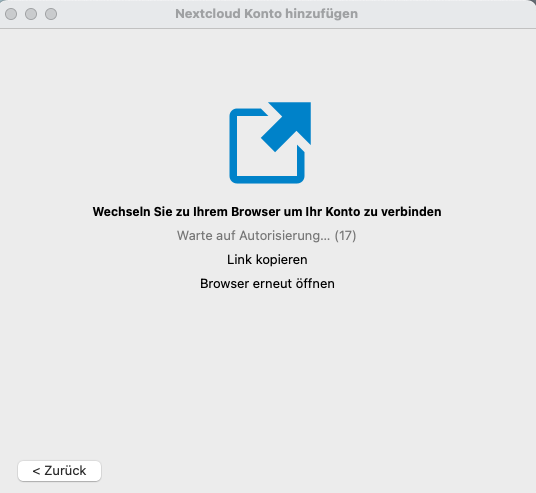
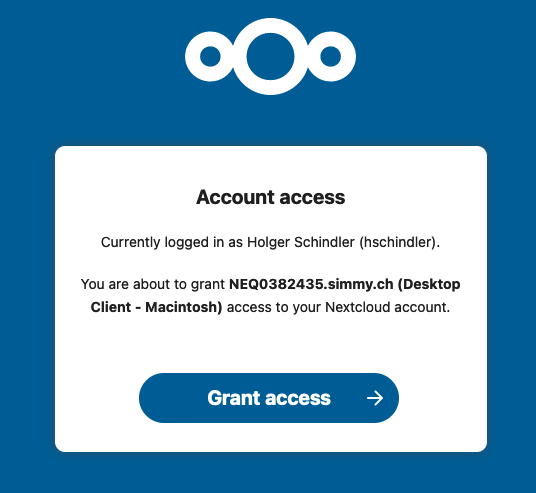
Click on "Grant access".
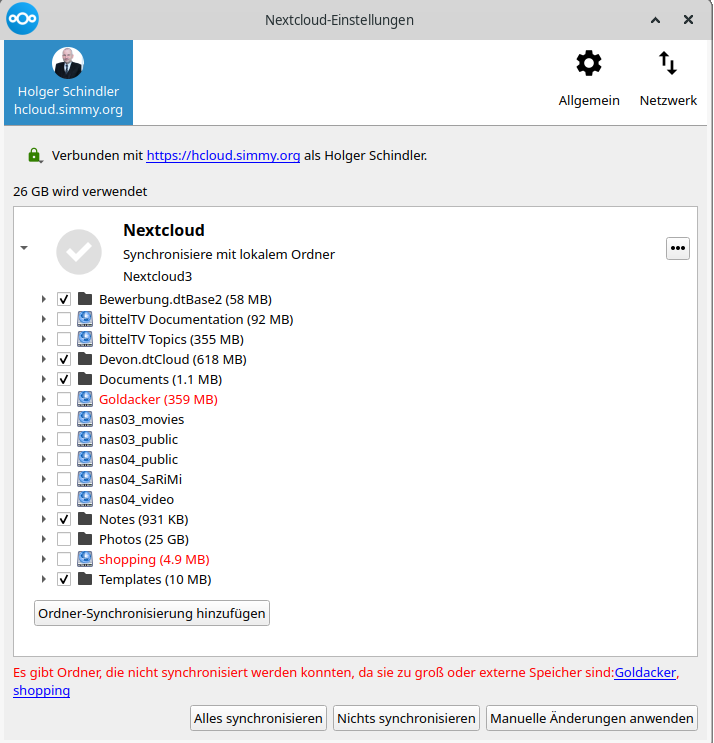
Configuration of the files to sync
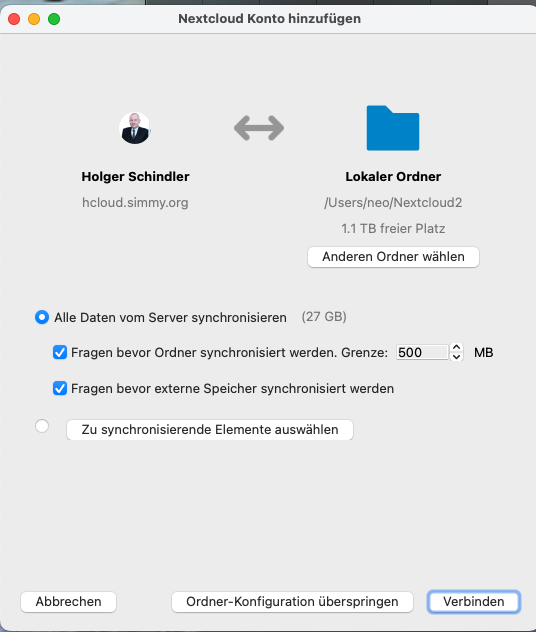
I strongly recommend to click on "select synchronization elements" and NOT using the default configuration.
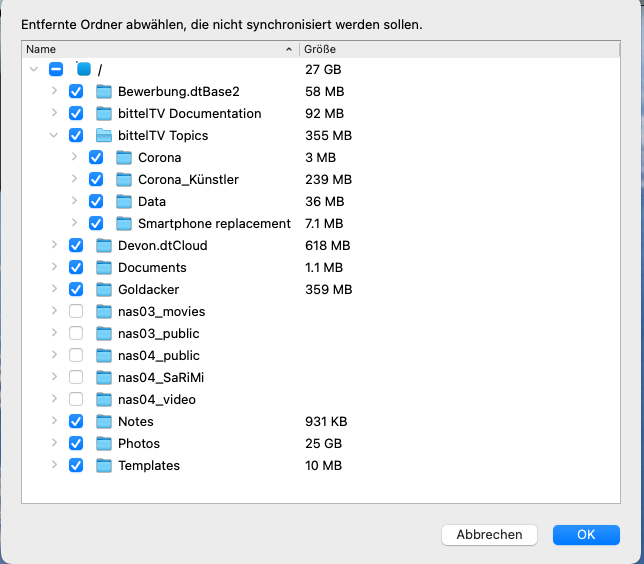
This view can look much different depending ont he kind of data you have access to.
This screen shows you exactly how much data is there to be synced to your machine. You can select very granular each sub-directory you need on your local machine. It's a matter of seconds to decide this. Look at the size of the directories. And decide. I recommend that you don't start a synchronization on directories with many Gigabytes. This will take to long.
Don't select nas03... or nas04... This will immediately fill all your local disk-space up and might render your machine unusable.
The next screen let's you decide to which folder the data will be synced. I recommend leaving this at the default settings. You can access your data within a couple minutes inside the folder Nextcloud. Normally the sync client will auto-start when you turn on your computer. There will be a very small icon either in the right upper or lower corner, where you can always go back and change the settings of the synchronization.
Office integration
Introduction
It is possible to integrate two different edit suites into Nextcloud:
- Collabora Office
- OnlyOffice
Collabora Office is the recommended solution of Nextcloud. OnlyOffice looks much more like MS Office. So I prefer and recommend OnlyOffice.
Collabora office will create all documents in a specific format: .odg. odp and .odt.
OnlyOffice will create all documents in the MS Office format: .xls, .ppt, .docx.
At the moment OnlyOffice is integrated, Collabora not.
Check if OnlyOffice integration is working
Goto Files, click on "+New".
You should see something like:

New form template, New presentation, New spreadsheet indicates that the integration is working.
Workarounds
If none of the office integrations is working, then there are a couple of workarounds.
Edit locally with Nextcloud sync client
Install the Nextcloud sync client on your computer and sync all the necessary directories/files to your computer and edit with local software. This is not only meant as workaround, but it is also a recommended way to work.
Edit locally
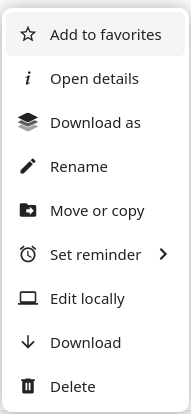
If you right click the file, then you will see a menu, that allows you to download the file.
You can "Download as", which allows you change the file format and saves the file on your local machine. Don't forget to upload the file after you finished your work.
You can "Edit locally", which should automatically open the appropriate software on your local machine. After clicking "save", the file should be uploaded to NextCloud automatically. Setback: this will only work if your client is correctly configured.
You can "Download". This will save the file on your local machine. Don't forget to upload the file after you finished your work.
Edit with OnlyOffice

If you originally created a file with Collabora and you make a right click on the file, you will see the above menu. It allows you to open the file in OnlyOffice or to convert the file to a format, that can be edited with OpenOffice.
Calendar CalDAV and adresses CardDAV
Introduction
Two very useful feature of the Nextcloud are CalDAV and CardDAV.
CalDAV is a calendar. This calendar can be used with almost any calendar software on the market (like Outlook or Calendar on macOS).
CardDAV is a very useful address book. It can be used together with outlook or with many other address book applications.
Have one calendar, address book on your mobile device (iPhone, Android Handy) on your Desktop (Windows or Apple) and in the Nextcloud. Addresses and dates will be automatically synced between all your devices and will be available on all devices.
Setup calendar and address book
Synchronizing with macOS
Synchronizing with Windows 10
Synchronizing with Android
Synchronizing with iOS
Easy usage
If you logon to the Nextcloud, go to your Profile and then click on Mobile & Desktop.
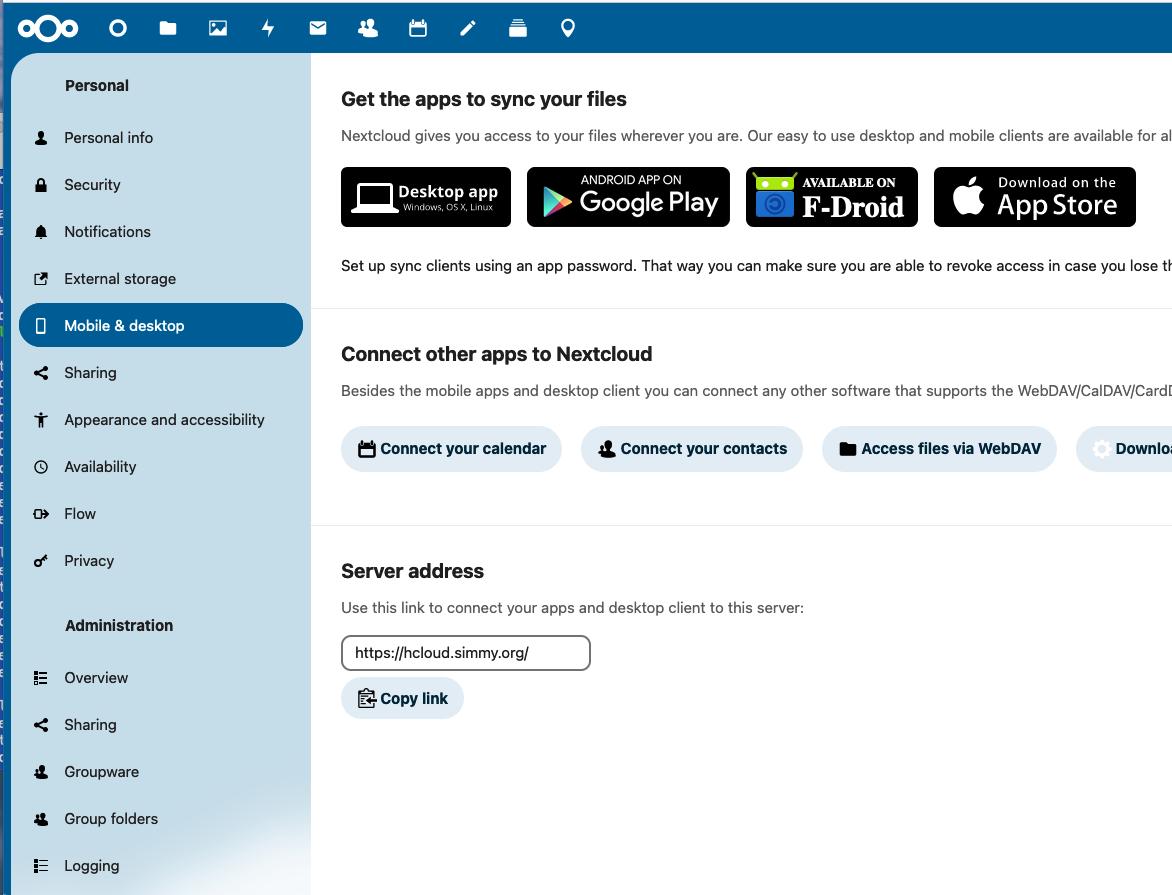
You will find lots of examples with pictures if you click on "Connect your calendar" and "Connect your contacts".
There is no need to download a configuration profile.
Installation Sync Client unter Linux
Vorwort
Die meisten Linux Distros bringen den nextcloud sync client native mit. Ich empfehle die Installation dieses Clients über den Linux Software Manager.
Darüber hinaus gibt es noch eine Fülle von weiteren Tools für die einzelnen Module der NextCloud:
- Password Client
- Bookmarks
- ebookreader
- ...
Installation
Öffne den Paketmanager von deinem Linux. Gehe auf "Suchern" (Lupensymbol) und suche nach nextcloud. Das Ergebnis sollte in etwa so aussehen:
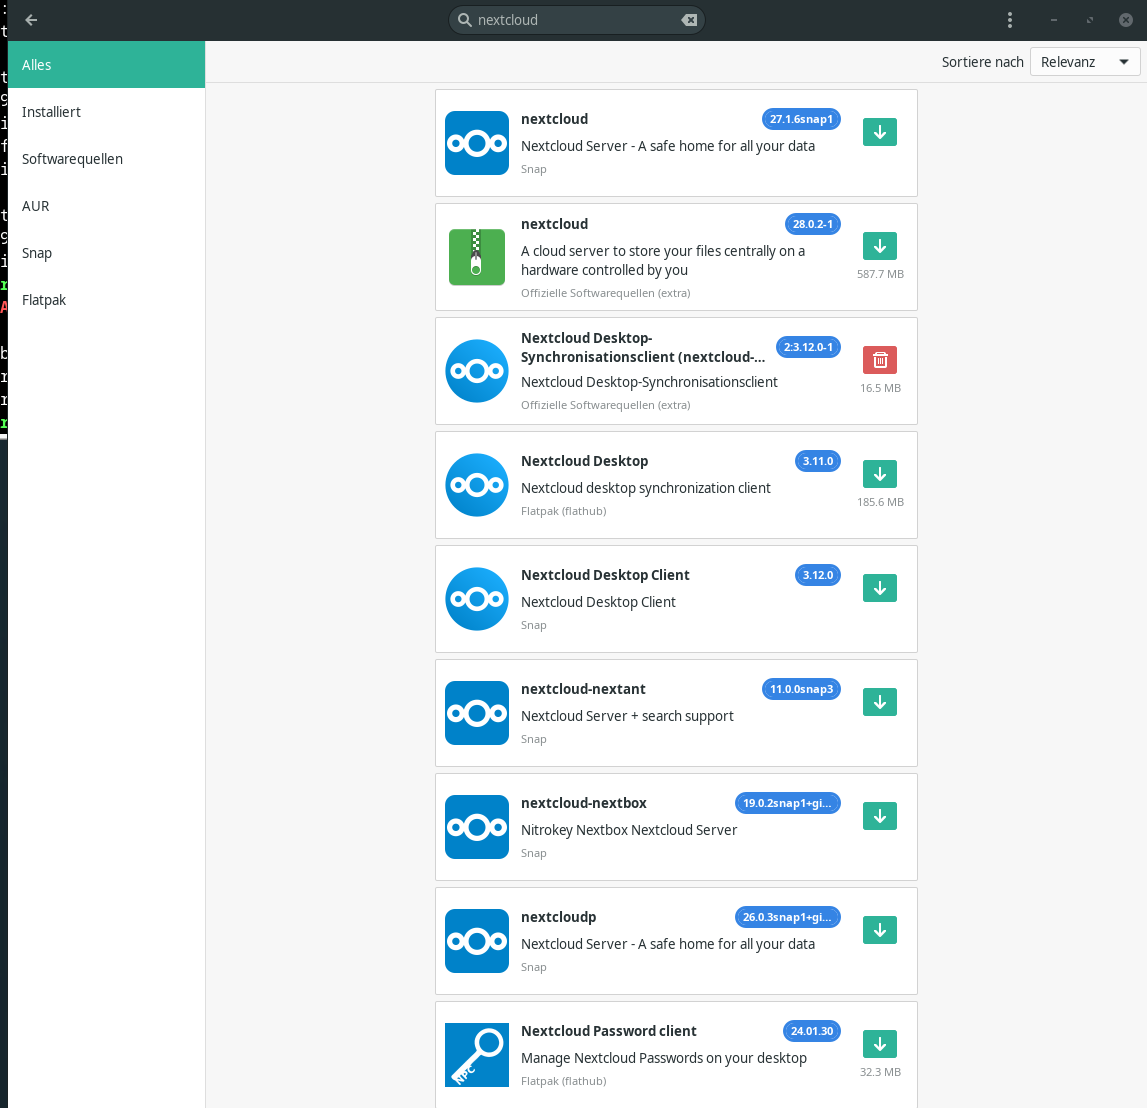
Hier kann man den NextCloud Desktop-Synchronisationsclient (hier: Version 2.13.12.0-1) anwählen.
Konfiguration
Registrierung
Step-by-step
Die Registrierung für neue Benutzer befindet sich hier:
Das ist auch gleichzeitig die Adresse des Self Service Portals um sein Passwort zurück zu setzen, sollte man es vergessen haben.
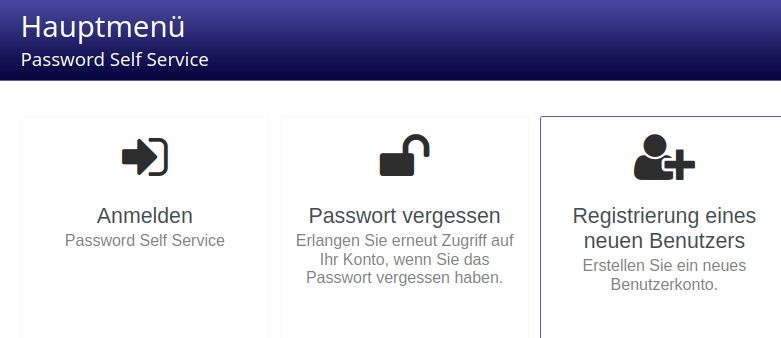
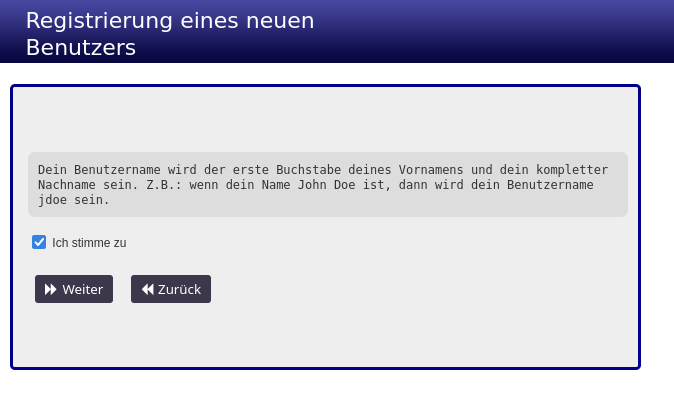
Möchte man sich registrieren, klickt man auf den Menüeintrag rechts: "Registrierung eines neuen Benutzers".
So sollte die nächste Seite aussehen:
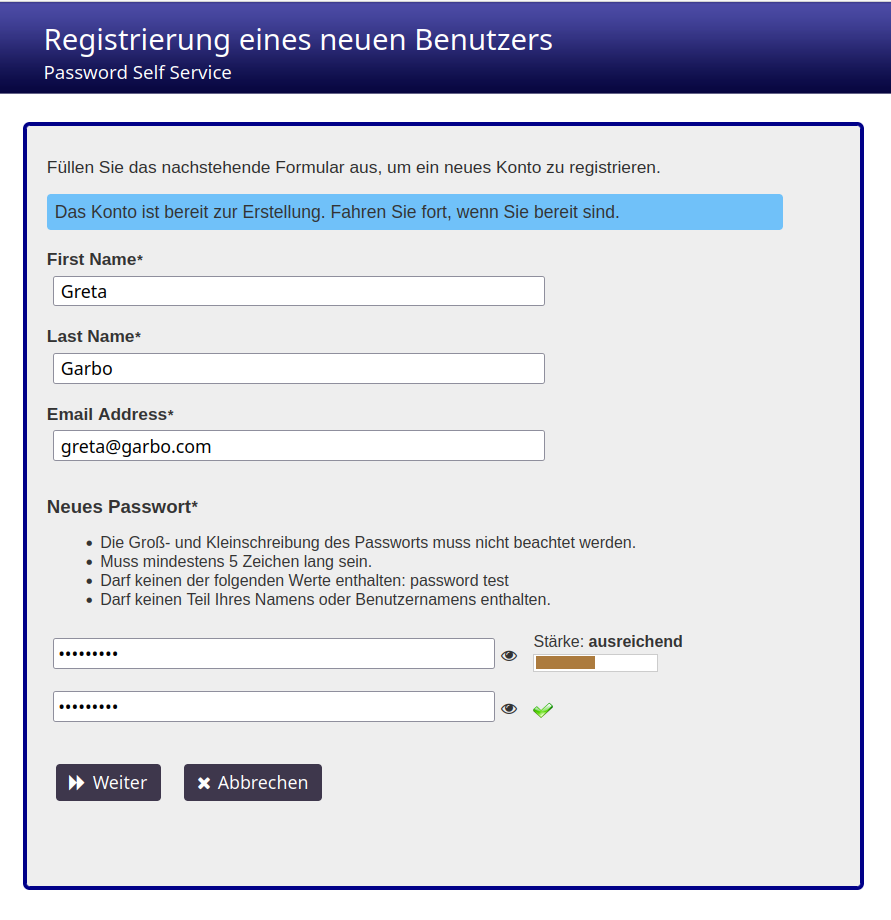
So sieht die nächste Maske aus:
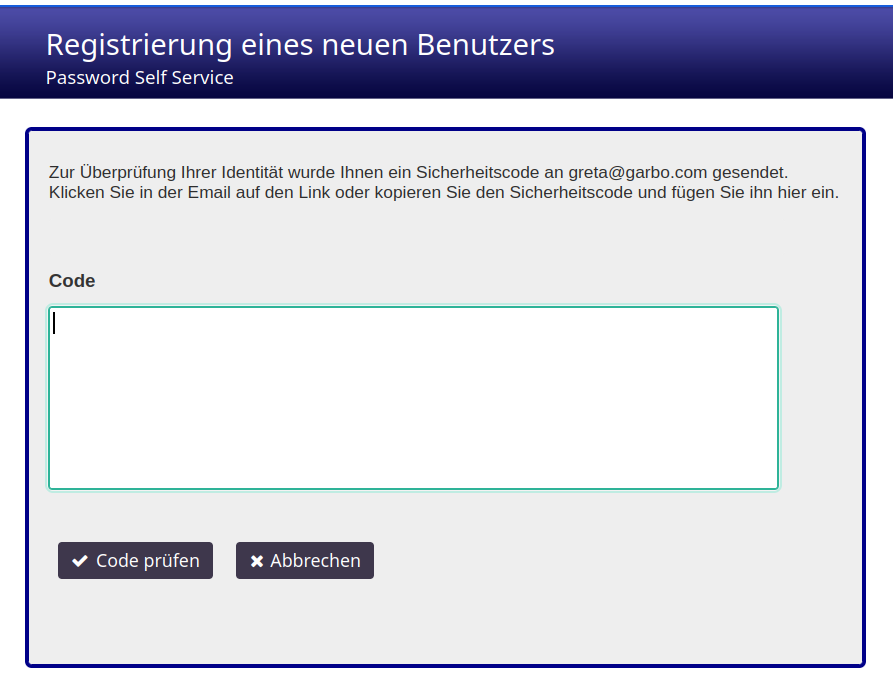
Anschliessend erhält man eine Email mit einem Link und einem Code. Klickt man auf dem Link, erscheint nach kurzer Zeit folgende Maske:
Umleitungsfehler
Es kann jedoch Probleme bei Browsern oder E-Mail Programmen geben. In diesem Falle kann man einfach den Code aus der E-Mail markieren und kopiren. Die Überprüfungsmaske kann man mit
https://portal.simmy.org/pwm/public/newuser
nochmals aufrufen. Dann kann man den Code in das Feld einfügen. Manchmal reicht es auch, auf die Adresszeile des Browsers zu klicken und Enter zu drücken.
Relax and recover
Introduction
IT turned out, that veaam does not work witch Arcolinux/archlinux, hence the installation of the component veeamsnap is broken. So I needed another solution. I tried out backup via dd, which I might show on another page, but finally I found this tool with the name rear - Relax and recover. It has multiple options and it seems to work very nice and it is extreme versatile. However, there is a setback. The configuration is very cryptic with configuration files and command line options. The documentation is very much scattered in the internet.
Relax-and-Recover (abbreviated ReaR) is an Open Source disaster recovery solution. It is a modular framework with many ready-to-go workflows for common situations.
Relax-and-Recover produces a bootable image. This image can re-partition the system. Once that is done it initiates a restore from backup. Restores to different hardware are possible. Relax-and-Recover can therefore be used as a migration tool as well.
Currently Relax-and-Recover supports various boot media:
- ISO
- PXE
- OBDR tape
- USB
- eSATA storage
It supports a variety of network protocols (incl. sftp, ftp, http, nfs, cifs) for storage and backup as well as a multitude of backup strategies (incl. IBM Tivoli Storage Manager, MircoFocus Data Protector, Symantec NetBackup, EMC NetWorker, EMC Avamar, FDR/Upstream, NovaStor DC, Rubrik Cloud Data Management (CDM), Bareos, Bacula, rsync, rbme, Borg). This results in a bootable image that is capable of booting via PXE, DVD/CD, bootable tape or virtual provisioning.
Installation
Installation on Arcolinux/Archlinux
The installation is straight forward. I used "Add/Remove Software".

The installation can take a while hence it is compiled from the Archlinux User Repository (AUR).
Installation on ZorinOS/Debian
apt install cifs-utils
apt install rearConfiguration
Create a file like /etc/rear/local.conf:
# Example configuration file for creating an ISO image that
# includes the rescue image and backup on 1 or more iso images
#
# Output defined to ISO image
OUTPUT=ISO
# Location to copy ISO image to
OUTPUT_URL=cifs://nas03.simmy.ch/mybackup
OUTPUT_OPTIONS="cred=/root/.smbcredentials"
# Backup to ISO uses the NETFS workflow
BACKUP=NETFS
# This could be also a mounted USB disk on /backup
BACKUP_URL=iso:///backup
# Split the backup.tar.gz into chunks of that maximum size so each ISO fits onto a DVD
ISO_MAX_SIZE=99999
# The default limit was to small. So I had to increase the size limit.
ISO_FILE_SIZE_LIMIT=9999999999
NETFS_KEEP_OLD_BACKUP_COPY=ySetup crontab
Create the shell script rear.backup.sh to execute the backup and cleanup the disk.
#! /usr/bin/bash
rear mkbackup -v -d
rm -Rf /var/tmp/rear*crontab -eNext time the script runs it will create a backup of the machine and move it automatically to nas03.simmy.ch/mybackup/hostname together with a README file and the log of the backup run.
Useful links
https://github.com/rear/rear/blob/master/doc/rear.8.adoc
https://github.com/rear/rear/tree/master/usr/share/rear/conf/examples
https://github.com/rear/rear/blob/master/doc/user-guide/relax-and-recover-user-guide.adoc
PWM Password Management
Introduction
Introduction
PWM is an open source password self-service application for LDAP directories
It includes:
- LDAP Directory Support
- Change Password module for Self-Service
- Account Activation / First time password assignment
- Password reset
- User registration
Multiple Deployment Options
- Java WAR file (bring your own application server, tested with Apache Tomcat)
- Java single JAR file (bring your own Java VM)
- Docker container
Multiple SSO options
- Basic Authentication
- HTTP header username injection
- Central Authentication Service (CAS)
- OAuth client
REST Server APIs for most functionality
- Password set
- Forgotten password
- Password policy reading
- User attribute updates
- Password policy verification
Installation / Architecture
The service is installed on portainer.simmy.ch. It is simply the default installation of the docker container.
Useful links
https://github.com/pwm-project/pwm
https://groups.google.com/g/pwm-general?pli=1
https://www.pwm-project.org/pwm/public/reference/
Installation
Introduction
There three different ways for the installation. I choose the docker deployment.
Requirements
- Debian Linux Server
- pre-installed docker
Installation
The PWM docker image includes Java and Tomcat. It listens using https on port 8443, and has a volume exposed as /config. You will need to map the /config volume to some type of persistent docker volume for PWM to retain configuration.
Download the newest version
Goto https://github.com/pwm-project/pwm/releases
find and download the most recent .tar file. In my case it was pwm-docker-image-2.0.6.tar.
Load the docker image
Load your docker image with image name of default pwm/pwm-webapp:
docker load --input=pwm-docker-image-v2.0.0.tarCreate file structure
I worked in the root path.
mkdir pwm-configThis subdirectoy will become very useful, hence there will be all fiels for configuration and debugging puposes.
Create docker image
Create docker image named mypwm, map to the server's 8443 port, and set the config volume to use the server's local file system /home/user/pwm-config folder (this will be the PWM application path for the container):
docker create --name mypwm -p '8443:8443' --mount 'type=bind,source=/root/pwm-config,destination=/config' pwm/pwm-webappStart the mypwm container:
docker start mypwm
Configuration
Introduction
After the installation it is necessary to configure several parameters and options to ensure the system works properly.
How To change values
The PWM can run in two different modes:
- config read only
- config editable
New registration are only working in the read only mode. If there is the need to change any configuration setting, the PWM config has to be set to editable. To do this, got to the directory /root/pwm-config, edit the file PwmConfiguration.xml and change the following property:
<property key="configIsEditable">false</property>Fortunately this is the first property of the file.
The key has to be changed from false to true. Save the file and exit the editor. After that open the webpage https://portal.simmy.org and you will find on the upper right corner a new menu, that enables you to edit any configuration setting. When you finished editing, safe. All changes are written to the file PwmConfiguration.xml. Reopen the file PwmConfiguration.xml and change the property Key configIsEditable to true.
In theory all settings can be changed directly in of the file PwmConfiguration.xml. The changes are applied immediately to the application. However, this is not recommended.
Password policy
It appears that the solution here (in case anyone else ever runs into this) is to change Settings...Password Settings...Password Policy Source to "Local".
https://groups.google.com/g/pwm-general/c/dQN9irsCZ2w/m/ESp9RLfdCAAJ
Valid E-Mail address
The original settings did not allow to enter E-mails with "_"s. So I had to change the corresponding regex that checks the entered E-Mail address for valid characters. I simply added the "_" to the list of allowed characters.
Regex:^[a-zA-Z0-9 .,'@]*$
Regex:^[a-zA-Z0-9_ .,'@]*$Bug at user registration
For some reasons the Token that is sent out by pwm gets changed by some web handlers or the E-mail software itself. I could at least partially solve it by overriding some defaults directly in the file PwmConfiguration.xml:
<setting key="pwm.appProperty.overrides" modifyTime="2024-02-21T16:26:32Z" syntax="STRING_ARRAY" syntaxVersion="0">
<label>Settings ^g Application ^g Application ^g App Property Overrides</label>
<value>security.http.permittedUrlPathCharacters=^[a-zA-Z0-9-_=]*$</value>
</setting>If there is still an error message, just press enter.
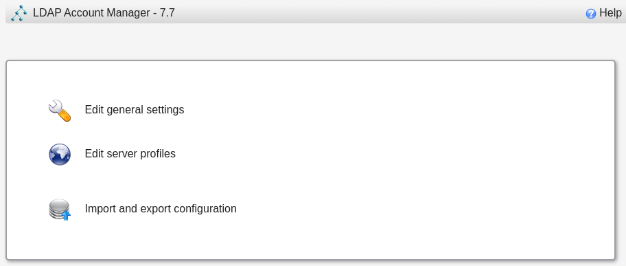
LDAP Account Manager
Introduction

What is the LDAP account manager?
LDAP Account Manager (LAM) is a web frontend for managing entries (e.g. users, groups, DHCP settings) stored in an LDAP directory. LAM was designed to make LDAP management as easy as possible for the user. It abstracts from the technical details of LDAP and allows persons without technical background to manage LDAP entries. If needed, power users may still directly edit LDAP entries via the integrated LDAP browser.
Features
The most important account types which are supported by LAM are Samba, Unix, Zarafa and PPolicy. The user can define profiles for all account types to set default values. Account information can be exported as PDF files. There is also the possibility to create users via file upload. It also includes the tree view of PhpLDAPadmin to access the raw LDAP attributes. LAM is translated to 16 languages.
Supported account types:
- Unix
- Samba 3,4
- Kolab
- Address book entries
- Asterisk (incl. voicemail and Asterisk extensions)
- Mail routing
- IMAP mailboxes (non-LDAP, via IMAP protocol)
- Hosts
- FreeRadius
- Authorized services
- SSH keys
- File system quota (in LDAP (systemQuotas) and via external script)
- DHCP entries
- NIS netgroups
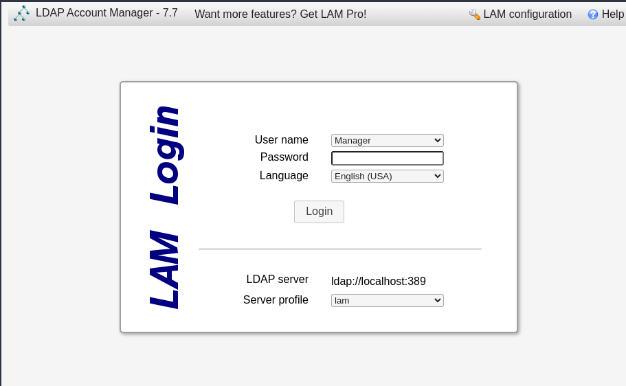
Installation on Turnkey Debian
Installation
apt -y install ldap-account-managerThe account manager is available on http://lamp.simmy.ch/lam.
Useful links
https://www.unixmen.com/setup-samba-domain-controller-with-openldap-backend-in-ubuntu-13-04/
https://www.ldap-account-manager.org/lamcms/howto
https://computingforgeeks.com/install-and-configure-ldap-account-manager-on-ubuntu/
https://www.ldap-account-manager.org/lamcms/documentation
Installation on Ubuntu Server 22.04
Install Apache Webserver and PHP
apt -y install apache2 php php-cgi libapache2-mod-php php-mbstring php-common php-pearThen enable php-cgi PHP extension:
a2enconf php*-cgi
systemctl reload apache2Install LDAP Account Manager
apt -y install ldap-account-managerThe account manager is available on http://lam.simmy.ch/lam.
Useful links
https://www.unixmen.com/setup-samba-domain-controller-with-openldap-backend-in-ubuntu-13-04/
https://www.ldap-account-manager.org/lamcms/howto
https://computingforgeeks.com/install-and-configure-ldap-account-manager-on-ubuntu/
https://www.ldap-account-manager.org/lamcms/documentation
Configuration of the LDAP Account Manager
Change master password
Click on LAM configuration on the upper right corner.
"Edit general settings"
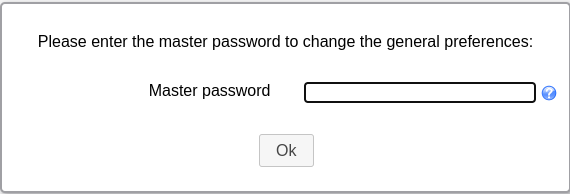
The Master password is "lam".
Scroll down to "Change master password" and enter your desired password two times.
The password will be saved in cleartext in a configuration file of LAM
Add certificates
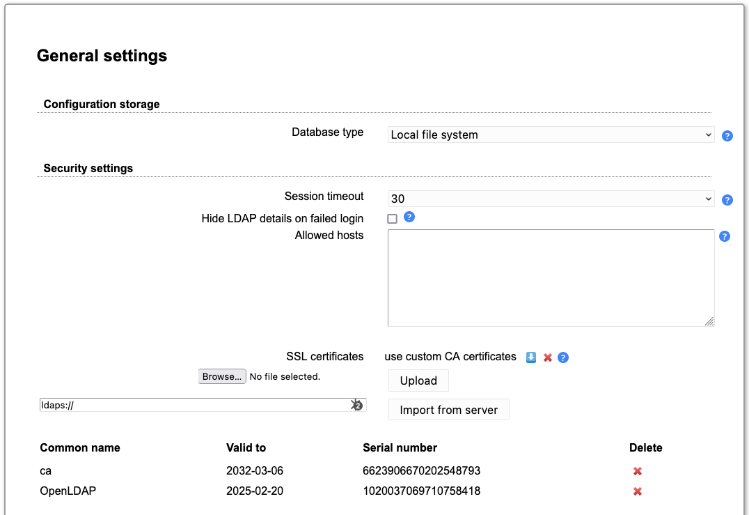
The communication with the the OpenLDAP server over SSL didn't work. So finally I added two certificates. The CA, which I simply uploaded (Choose file --> "Upload") and the certificate of the Domain Controller (enter ldaps://openldap.simmy.ch --> "Import from server").
Scroll down and click "Ok". Restart the apache server:
systemctl restart apache2Create a profile for OpenLDAP
Click on LAM configuration on the upper right corner.
Click on "Edit server profiles".
Click on "Manage server profiles".
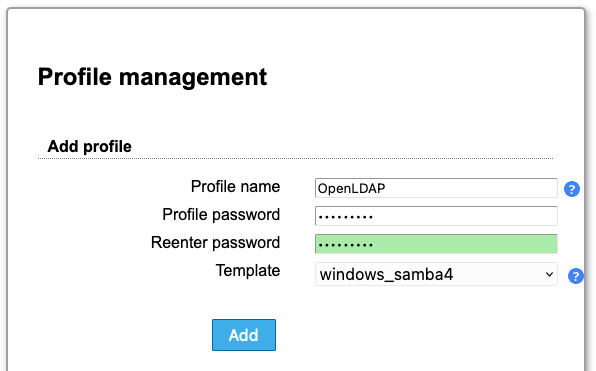
Enter these options:
- Profile name --> OpenLDAP
- Profile password --> your password here
- Reenter password --> your password here
- Template --> choose Template "unix" for OpenLDAP
- Add
The password will be saved in cleartext in a configuration file of LAM
Configuration of the profile for OpenLDAP

General settings
Server settings
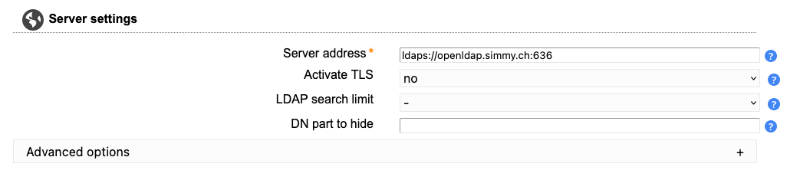
Server address --> ldap://openldap.simmy.ch:389
Tool settings
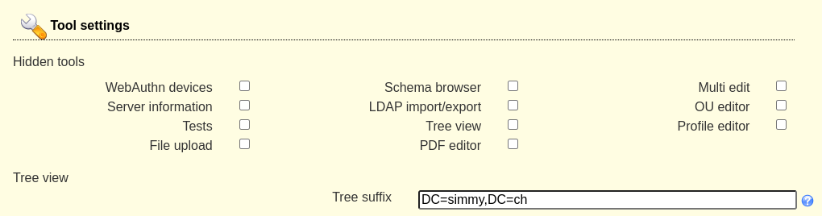
Tree suffix: DC=simmy,DC=ch
Security settings

Login method: Fixed list
List of valid users:
cn=admin,dc=simmy,dc=ch
cn=binduser,ou=Users,dc=simmy,dc=ch
cn=Holger Schindler,ou=Users,dc=simmy,dc=chAccount types
Create the OU groups before doing this:
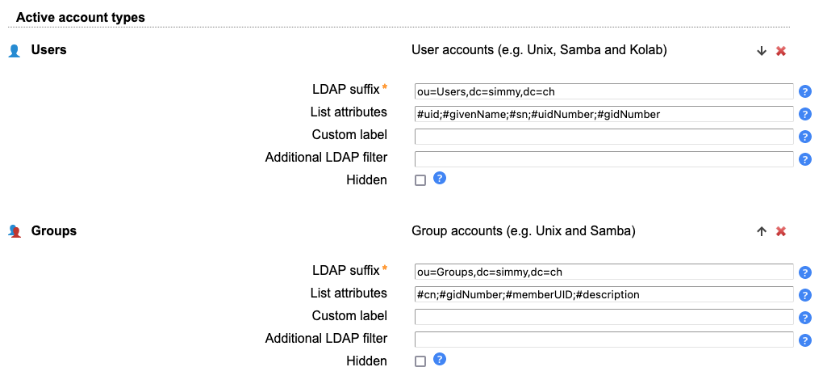
These two LDAP suffixes have to be set:
- CN=Users,DC=simmy,DC=ch
- OU=Groups,DC=simmy,DC=ch
Modules
Nothing to change here.
Module settings
Nothing to change here.
Final
"Save" and login to your profile "OpenLDAP. You will have to enter the password of the Administrator.
Useful links
https://www.unixmen.com/setup-samba-domain-controller-with-openldap-backend-in-ubuntu-13-04/
https://www.ldap-account-manager.org/lamcms/howto
https://computingforgeeks.com/install-and-configure-ldap-account-manager-on-ubuntu/
https://www.ldap-account-manager.org/lamcms/documentation
https://www.ldap-account-manager.org/static/doc/manual.pdf
Supermicro SuperServer 743A
Introduction
Motherboard is about to be changed.
Hardware description
Chassis SuperChassis 743AC-668
|
|
 |

-
PSU: 865W, silent
-
https://www.supermicro.com/en/products/chassis/4u/743/sc743ac-668b
Motherboard
old
Supermicro Mainboard X8DTI-F
https://www.supermicro.com/products/archive/motherboard/x8dti-f
new
Supermicro Mainboard X9DRi-F Rev 1.11A LGA2011 C602 PCIe 3.0 IPMI E-ATX 16xDDR3
https://www.supermicro.com/products/archive/motherboard/x9dri-f
https://www.thomas-krenn.com/en/wiki/Supermicro_X9DRi-F_Motherboard
RAM
Total Amount: 48 GB
| Amount | Size | Manufacturer | Model | Voltage | Speed | Part No. |
|---|---|---|---|---|---|---|
| 12 | 4 GB | Samsung | DDR3L Registered ECC DIMM | 1.35 V | 1333 MHz | M393B5270H0-CH9 |
CPU
old
2 x Intel® Xeon® Processor E5620
| Model number | Cores | Frequency | Turbo | L2 cache | L3 cache | TDP | Socket | I/O bus | Memory |
Release date |
|---|---|---|---|---|---|---|---|---|---|---|
| Xeon E5620 | 4 | 2.4 GHz | 1/1/2/2 | 4 × 256 KB | 12 MB | 80 W | LGA 1366 | 2 × 5.86 GT/s QPI | 3 × DDR3-1066 | March 16, 2010 |
new
1 x Intel® Xeon® Processor E5-2637 v2
proposed: 2 x Intel® Xeon® Processor E5-2697 v2, each CHF 27
| Model number | Cores | Frequency | Turbo | L2 cache | L3 cache | TDP | Socket | I/O bus | Memory |
Release date |
|---|---|---|---|---|---|---|---|---|---|---|
| Xeon E5-2637 v2 | 4 | 3.8 GHz | 3/3/4/4/5/5 | 4 × 256 KB | 15 MB | 130 W | LGA 2011 | 2 x 8 GT/s QPI | 4 × DDR3-1866 | Q3'13 |
Harddisks
| Vendor | Type | Interface | Label | Capacity | Purpose | Filesystem |
| Patriot Inferno | SSD | SATA III | A55 | 60 GB | OS/Booting | UFS |
Network Interface Card NIC

IBM Emulex 10GbE Virtual Fabric Adapter II
- Dual-channel, 10 Gbps Ethernet link speed
- 2 Fiber Links
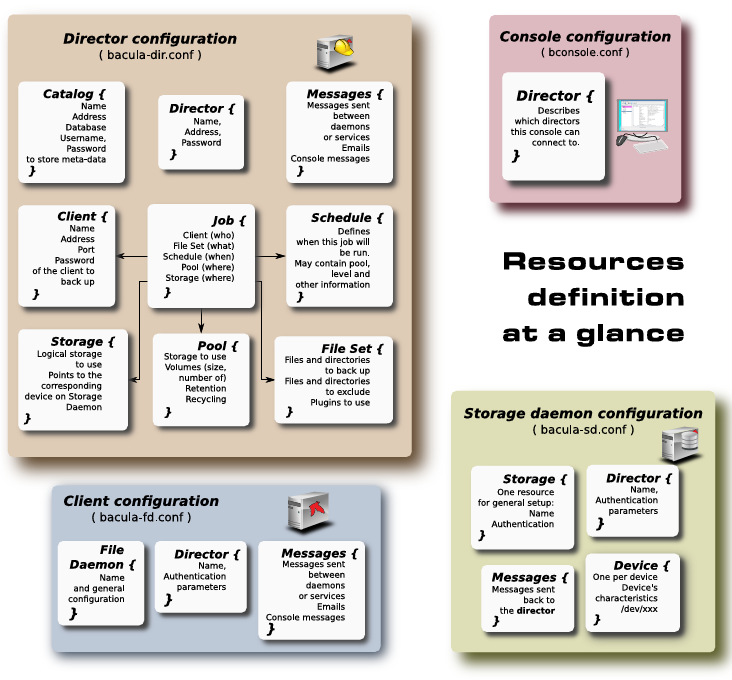
Bacula
Introduction Bacula
Introduction
Bacula is an open-source, enterprise-level computer backup system for heterogeneous networks. It is designed to automate backup tasks that had often required intervention from a systems administrator or computer operator.
Architecture
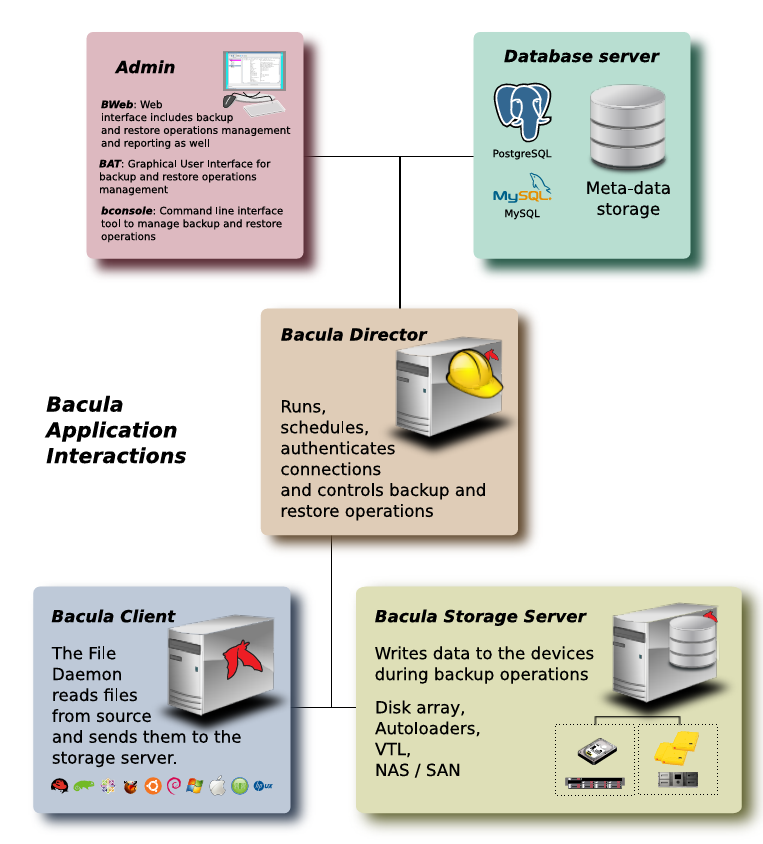
Components
Bacula Director
Server component. Supervisor.
Bacula Console/Admin
Interface for the Director. There are text versions and GUIs:
- BWeb
- BAT
- bConsole
Bacula Client
File daemon installed on the client.
Bacula Storage
Interface to the storage components. Here a share on the NAS.
Catalog
SQL database.
Bacula Monitor
Monitor program. Works with GTK+ (GNOME, KDE, FreeDesktop.org system tray standard).
Installation server components
Introduction
In general, you should get the binary packages from your download area on www.bacula.org. You can either download what you need or setup a repository pointing to the download area that will allow you to use your installer program such as apt to ensure that all the dependencies a met.
This will install these components:
- Database Server PostgreSQL
- Bacula Director
- Bacula Storage Server
Setup the repository
apt-get install apt-transport-https
wget https://bacula.org/downloads/Bacula-4096-Distribution-Verification-key.asc
apt-key add Bacula-4096-Distribution-Verification-key.ascAdd to your /etc/apt/sources.list file the following entries:
# Bacula
deb https://www.bacula.org/packages/65f518dfc0382/debs/13.0.4 bookworm mainInstallation
apt-get update
apt-get install dbconfig-common postgresql
apt-get install bacula-postgresqlI choose the name of the application as password for the Postgre Database. There is small untilitiy installed with the director: bconsole.
Useful links
Configuration
The configuration files are located in /opt/bacula/etc/.
Evaluation
Despite the fact that the architecture looks very promising, I finally abandoned the project. There are three reasons:
- The client app for Archlinux is broken
- It's difficult to install on Debian
- The interesting parts of the project are taken by a commercial company (https://www.baculasystems.com/company/)
NEVIS
Installation of NEVIS
Introduction
I decided to install NEVIS inside a kubernetes cluster.
Installation in Kubernetes Cluster
Installation of kubernetes
Fedora installation of kubernetes
sudo dnf install kubernetes kubernetes-kubeadm kubernetes-clientsudo systemctl enable kubelet.service
sudo systemctl enable containerd
sudo systemctl start containerd
sudo swapoff -a
sudo dnf install iproute-tc
sudo cat <<EOF | sudo tee /etc/modules-load.d/k8s.conf
overlay
br_netfilter
EOF
sudo modprobe overlay
sudo modprobe br_netfilter
# sysctl params required by setup, params persist across reboots
sudo cat <<EOF | sudo tee /etc/sysctl.d/k8s.conf
net.bridge.bridge-nf-call-iptables = 1
net.bridge.bridge-nf-call-ip6tables = 1
net.ipv4.ip_forward = 1
EOF
# setting DNS correcly
sudo mkdir -p /etc/systemd/resolved.conf.d/
sudo cat <<EOF | sudo tee /etc/systemd/resolved.conf.d/stub-listener.conf
[Resolve]
DNSStubListener=no
EOF
sudo sysctl --system
sudo systemctl enable --now kubelet
sudo kubeadm init
# set KUBELET_KUBEADM_ARGS
sudo tee -a /etc/kubernetes/kubelet.conf <<EOF
KUBELET_LOG_LEVEL=5
KUBELET_KUBEADM_ARGS="--v=4 --logtostderr=true"
EOFKubelet configuration
Accessing the cluster as normal user
mkdir -p $HOME/.kube
sudo cp -i /etc/kubernetes/admin.conf $HOME/.kube/config
sudo chown $(id -u):$(id -g) $HOME/.kube/config# Allow the control plane machine to also run pods for applications. Otherwise more than one machine is needed in the cluster.
kubectl taint nodes --all node-role.kubernetes.io/control-plane-
# Install flannel into the cluster to provide cluster networking. There are many other networking solutions besides flannel. Flannel is straightforward and suitable for this guide.
kubectl apply -f https://github.com/coreos/flannel/raw/master/Documentation/kube-flannel.ymlUseful commands
sudo systemctl restart kubelet
sudo systemctl status kubelet
sudo journalctl -u kubelet
ss -tlnp | grep 6443
kubectl config use-context
kubectl config view
kubectl cluster-info
kubectl get pods --all-namespaces
kubectl get svc -A
kubectl get events --namespace=kube-system
kubectl get nodes -o wideAdditional .conf files:
The kubernetes-kubeadm rpm installs an overriding kubelet unit file at:
/usr/lib/systemd/system/kubelet.service.d/10-kubeadm.confWe strongly recommend to not modify either file as any changes could be lost during an update.
As documented by the Kubernetes team (https://kubernetes.io/docs/setup/production-environment/tools/kubeadm/kubelet-integration/#the-kubelet-drop-in-file-for-systemd), create the following directory for user managed, system-level systemd kubelet overrides:
$ sudo mkdir -p /etc/systemd/system/kubelet.service.d/Then create a unit file (.conf extension required) and copy the file to the directory listed above. Settings in this file will override settings from either or both of the default systemd files.
misc
Run "kubectl apply -f [podnetwork].yaml" with one of the options listed at:
https://kubernetes.io/docs/concepts/cluster-administration/addons/
Then you can join any number of worker nodes by running the following on each as root:
kubeadm join 192.168.1.35:6443 --token dapwn1.21bvsun7tw95b6j7 \
--discovery-token-ca-cert-hash sha256:bc878aa0a8db726627f0be2a9bfbec584bde1156114e1af61aa727e2e39302b5
iRedMail
Introduction to iRedMail

iRedMail
RedMail is a complete open-source mail suite that include a mail server, and a webmail client. It is built for enterprise use as it support Calendars management and sync, Contact Sync ActiveSync, CalDav and CardDav and more. By default, iRedMail supports POP3, IMAP, SMTP over TLS and offers an outstanding webmail app with full HTTPS support. Emails are encrypted using TLS and passwords are stored in SSH512 or BCRYPT. It is up to the system admin to choose where and how to store emails, as iRedMail supports OpenLDAP, MySQL, MariaDB, and PostgreSQL.
Features
- Web admin
- Webmail application with HTTPS support
- Supports multiple backends
- Easy to install
- Docker support
- Deploys on several operating systems
- Calendars/Contacts/ActiveSync*
- Supports other webmail systems like SOGo Groupware, Roundcube Webmail
- Rich documentation
- Supports POP3, IMAP, SMTP over TLS
- Multi-domain support
- IP ban
- mailbox quota configuration
- LDAP support
- Mail folders support
- Auto-spam protection
- Supports third-party antivirus and spam protection software
- mailing list support
- trash folder management
- Full SOGo Groupware integration
- Webmail customization
- Third-party integration
- Cluster support
- Rich documentation
- Packed by a strong community of developers and enterprise users.
Useful links
https://www.iredmail.org/easy.html
https://docs.iredmail.org/iredmail-easy.getting.start.html
Installation iRedMail
System Requirements
To install iRedMail on Debian or Ubuntu Linux, you need:
- A FRESH, working Debian/Ubuntu Linux. Supported releases are listed on Download page
- At least 4 GB memory is required for a low traffic production mail server with spam/virus scanning enabled
- Make sure 3 UID/GID are not used by other user/group: 2000, 2001, 2002
First steps
Install Debian server from scratch
Run ubuntusecure.sh
Installation
https://docs.iredmail.org/install.iredmail.on.debian.ubuntu.html#start-iredmail-installer
Postinstallation
install webmin
install phpldapadmin
https://www.digitalocean.com/community/tutorials/how-to-install-and-configure-openldap-and-phpldapadmin-on-ubuntu-16-04
https://forum.iredmail.org/topic14529-install-phpldapadmin-nginx.html
install check_mk agent
Local Firewall Configuration
apt remove nftablesopen ports:
| Protocol |
port |
misc |
| HTTP |
80 |
|
| HTTPS |
443 |
recommended |
| LDAP |
389 |
|
| LDAPS |
636 |
recommended |
| POP3/STARTTLS | 110 |
recommended |
| POS3/SSL | 995 |
|
| IMAP/STARTLS | 143 |
recommended |
| IMAP/SSL | 993 |
|
| SMTP/STARTTLS | 587 |
recommended |
| SMTP/SSl |
465 |
|
| SSH |
22 |
|
| Webmin |
12321 | |
| check_mk |
6556 |
Install ufw
apt update
apt install ufwConfigure ufw
ufw default deny incoming
# Allow SSH (Port 22)
ufw allow 22/tcp
# Allow HTTP (Port 80) and HTTPS (Port 443) for web services (Roundcube/SOGo)
#ufw allow 80/tcp
ufw allow 443/tcp
# Allow SMTP (Port 25) for email sending
sudo ufw allow 25/tcp
# Allow IMAP (Port 143) and IMAPS (Port 993) for email access
ufw allow 143/tcp
ufw allow 993/tcp
# Allow POP3 (Port 110) and POP3S (Port 995) for email access
ufw allow 110/tcp
ufw allow 995/tcp
# Allow LDAP (Port 389) and LDAPS (Port 636) for secure LDAP communication
ufw allow 636/tcp
ufw allow 389/tcp
# Allow SMTPS (Port 465) for secure SMTP communication
ufw allow 465/tcp
# Allow port 12321 (Webmin) for system administration
ufw allow 12321/tcp
# Allow SMTP/STARTTLS
ufw allow 587
# Allow port 6556 (Checkmk) for monitoring purposes
ufw allow 6556/tcp
ufw enable
ufw status
# Logging: Enable logging to monitor ufw activity:
ufw logging on
Outgoing Traffic: By default, ufw allows all outgoing traffic.
Enable all E-Mails from simmy.ch
python3 /opt/iredapd/tools/greylisting_admin.py --disable --from @simmy.chLDAP Repl
LDAP Schema update
| Schema openldap.simmy.ch | Schema mail.simmy.ch |
| core | core |
| collective | collective |
| corba | corba |
| cosine | cosine |
| duaconf | duaconf |
| dyngroup | dyngroup |
| inetorgperson | inetorgperson |
| java | java |
| kerberos | |
| ldapns | |
| misc | misc |
| nis |
nis |
| openldap | openldap |
| openssh-lpk | |
| pmi | pmi |
| ppolicy | |
| samba | |
| namedobject | |
| msuser | |
| iredmail | |
| dsee | |
| amavis | |
| calentry | |
| calresource |
Useful links
Details of this iRedMail installation
Admin of domain fmail.simmy.ch:
- Account: postmaster@fmail.simmy.ch
- Password: *
You can login to iRedAdmin with this account, login name is full email address.
First mail user:
- Username: postmaster@fmail.simmy.ch
- Password: *
- SMTP/IMAP auth type: login
- Connection security: STARTTLS or SSL/TLS
You can login to webmail with this account, login name is full email address. - Enabled services:
- rsyslog
- postfix
- slapd
- mysql
- nginx
- php8.2-fpm
- dovecot
- clamav-daemon
- amavis
- clamav-freshclam
- sogo
- memcached
- fail2ban
- cron nftables
SSL Configuration
SSL cert keys (size: 4096):
- /etc/ssl/certs/iRedMail.crt
- /etc/ssl/private/iRedMail.key
Mail Storage:
- Mailboxes: /var/vmail/vmail1
- Mailbox indexes:
- Global sieve filters: /var/vmail/sieve
- Backup scripts and backup copies: /var/vmail/backup
OpenLDAP:
- LDAP suffix: dc=simmy,dc=ch
- LDAP root dn: cn=Manager,dc=simmy,dc=ch, password: *
- LDAP bind dn (read-only): cn=vmail,dc=simmy,dc=ch, password: *
- LDAP admin dn (read-write): cn=vmailadmin,dc=simmy,dc=ch, password: *
- LDAP base dn: o=domains,dc=simmy,dc=ch
- LDAP admin base dn: o=domainAdmins,dc=simmy,dc=ch
- Configuration files:
- /etc/ldap
- /etc/ldap/slapd.conf
- /etc/ldap/ldap.conf
- /etc/ldap/schema/iredmail.schema
- Log file related:
- /etc/rsyslog.conf
- /var/log/openldap/openldap.log
- /etc/logrotate.d/openldap
- Data dir and files:
- /var/lib/ldap
- /var/lib/ldap/simmy.ch
- RC script:
- /etc/init.d/slapd
- See also:
- /root/iRedMail-1.6.8/runtime/ldap_init.ldif
Backup LDAP data:
- Script: /var/vmail/backup/backup_openldap.sh
- See also:
crontab -l -u root
MySQL:
- Root user: root, Password: "*" (without quotes)
- Bind account (read-only):
- Username: vmail, Password: *
- Vmail admin account (read-write):
Username: vmailadmin, Password: * - Config file: /etc/mysql/my.cnf
- RC script: /etc/init.d/mysql
Backup MySQL database:
- Script: /var/vmail/backup/backup_mysql.sh
- See also:
crontab -l -u rootPostfix:
- Configuration files:
- /etc/postfix
- /etc/postfix/aliases
- /etc/postfix/main.cf
- /etc/postfix/master.cf - SQL/LDAP lookup config files:
- /etc/postfix/ldap
Dovecot:
- Configuration files:
- /etc/dovecot/dovecot.conf
- /etc/dovecot/dovecot-ldap.conf (For OpenLDAP backend)
- /etc/dovecot/dovecot-mysql.conf (For MySQL backend)
- /etc/dovecot/dovecot-pgsql.conf (For PostgreSQL backend)
- /etc/dovecot/dovecot-used-quota.conf (For real-time quota usage)
- /etc/dovecot/dovecot-share-folder.conf (For IMAP sharing folder) - Syslog config file:
- /etc/rsyslog.d/1-iredmail-dovecot.conf (present if rsyslog >= 8.x) - RC script: /etc/init.d/dovecot
- Log files:
- /var/log/dovecot/dovecot.log
- /var/log/dovecot/sieve.log
- /var/log/dovecot/lmtp.log
- /var/log/dovecot/lda.log (present if rsyslog >= 8.x)
- /var/log/dovecot/imap.log (present if rsyslog >= 8.x)
- /var/log/dovecot/pop3.log (present if rsyslog >= 8.x)
- /var/log/dovecot/sieve.log (present if rsyslog >= 8.x) - See also:
- /var/vmail/sieve/dovecot.sieve
- Logrotate config file: /etc/logrotate.d/dovecot
Nginx:
- Configuration files:
- /etc/nginx/nginx.conf
- /etc/nginx/sites-available/00-default.conf
- /etc/nginx/sites-available/00-default-ssl.conf - Directories:
- /etc/nginx
- /var/www/html - See also:
- /var/www/html/index.html
php-fpm:
- Configuration files: /etc/php/8.2/fpm/pool.d/www.conf
PHP:
- PHP config file for Nginx:
- Disabled functions:
- posix_uname,
- eval,pcntl_wexitstatus,
- posix_getpwuid,
- xmlrpc_entity_decode,
- pcntl_wifstopped,
- pcntl_wifexited,
- pcntl_wifsignaled,
- phpAds_XmlRpc,
- pcntl_strerror,
- ftp_exec,
- pcntl_wtermsig,
- mysql_pconnect,
- proc_nice,
- pcntl_sigtimedwait,
- posix_kill,
- pcntl_sigprocmask,
- fput,phpinfo,
- system,
- phpAds_remoteInfo,
- ftp_login,
- inject_code,
- posix_mkfifo,
- highlight_file,
- escapeshellcmd,
- show_source,
- pcntl_wifcontinued,
- fp,pcntl_alarm,
- pcntl_wait,
- ini_alter,
- posix_setpgid,
- parse_ini_file,
- ftp_raw,
- pcntl_waitpid,
- pcntl_getpriority,
- ftp_connect,
- pcntl_signal_dispatch,
- pcntl_wstopsig,
- ini_restore,
- ftp_put,
- passthru,
- proc_terminate,
- posix_setsid,
- pcntl_signal,
- pcntl_setpriority,
- phpAds_xmlrpcEncode,
- pcntl_exec,
- ftp_nb_fput,
- ftp_get,
- phpAds_xmlrpcDecode,
- pcntl_sigwaitinfo,
- shell_exec,
- pcntl_get_last_error,
- ftp_rawlist,
- pcntl_fork,
- posix_setuid
ClamAV:
- Configuration files:
- /etc/clamav/clamd.conf
- /etc/clamav/freshclam.conf
- /etc/logrotate.d/clamav - RC scripts:
+ /etc/init.d/clamav-daemon
+ /etc/init.d/clamav-freshclam
Amavisd-new:
- Configuration files:
- /etc/amavis/conf.d/50-user
- /etc/postfix/master.cf
- /etc/postfix/main.cf - RC script:
- /etc/init.d/amavis - SQL Database:
- Database name: amavisd
- Database user: amavisd
- Database password: CD29UskrVQrnmOmpUFFjjK9rIkSG8hTL
DNS record for DKIM support:
; key#1 2048 bits, s=dkim, d=fmail.simmy.ch, /var/lib/dkim/fmail.simmy.ch.pem
dkim._domainkey.fmail.simmy.ch. 3600 TXT (
"v=DKIM1; p="
"MIIBIjANBgkqhkiG9w0BAQEFAAOCAQ8AMIIBCgKCAQEAtrGqXyV/sPx7xEDcdVlQ"
"Z+d+ppkN2SM511wsICsqYqdJm594s7ThzKB4QKcw2NSCx3p+rtFMKGEj6tkBzHgm"
"yB7E1aT09SPfxWpK8udMi4MrvZ5uQtpyaihi28DNgUpkqCHnLFBC4SBvQthorHk5"
"uvAr83Wsoxlh2KzXGNKW2xX/4/720lDChYiS3OcpgHQHSE1ZfvWQqrdoCN9GUo7E"
"wsszInYC3ryTYTugjMlzkj+mMr2yp2+Nl+UXjz08KdGWaSsKZi4TASjJ7XD2u7gY"
"QS0ZjXPVjpbc3l3kcaNlvGjxiaj7/h1vJjZzj8MT5ij2IpkHzTCGk/yAF6OJrjS9"
"3QIDAQAB")SpamAssassin:
- Configuration files and rules:
- /etc/mail/spamassassin
- /etc/mail/spamassassin/local.cf
iRedAPD - Postfix Policy Server:
- Version: 5.3.3
- Listen address: 127.0.0.1, port: 7777
- SQL database account:
- Database name: iredapd
- Username: iredapd
- Password: * - Configuration file:
- /opt/iredapd/settings.py - Related files:
- /opt/iRedAPD-5.3.3
- /opt/iredapd (symbol link to /opt/iRedAPD-5.3.3
iRedAdmin - official web-based admin panel:
- Version: 2.5
- Root directory: /opt/www/iRedAdmin-2.5
- Config file: /opt/www/iRedAdmin-2.5/settings.py
- Web access:
- URL: https://mail.simmy.ch/iredadmin/
- Username: postmaster@fmail.simmy.ch
- Password: bs3FUy3JQfam&U - SQL database:
- Database name: iredadmin
- Username: iredadmin
- Password: * - Roundcube webmail:
/opt/www/roundcubemail-1.6.5
- Config file: /opt/www/roundcubemail-1.6.5/config
- Web access:
- URL: http://mail.simmy.ch/mail/ (will be redirected to https:// site)
- URL: https://mail.simmy.ch/mail/ (secure connection)
- Username: postmaster@fmail.simmy.ch
- Password: * - SQL database account:
- Database name: roundcubemail
- Username: roundcube
- Password: * - Cron job:
- Command: "crontab -l -u root"
SOGo Groupware:
- Web access: https://mail.simmy.ch/SOGo/
- Main config file: /etc/sogo/sogo.conf
- Nginx template file: /etc/nginx/templates/sogo.tmpl
- Database:
- Database name: sogo
- Database user: sogo
- Database password: * - SOGo sieve account (Warning: it's a Dovecot Master User):
- file: /etc/sogo/sieve.cred
- username: sogo_sieve_master@not-exist.com
- password: * - See also:
- cron job of system user: sogo
netdata (monitor):
- Config files:
- All config files: /opt/netdata/etc/netdata
- Main config file: /opt/netdata/etc/netdata/netdata.conf
- Modified modular config files:
- /opt/netdata/etc/netdata/go.d
- /opt/netdata/etc/netdata/python.d - HTTP auth file (if you need a new account to access netdata, please
update this file with command like 'htpasswd' or edit manually):
- /etc/nginx/netdata.users - Log directory: /opt/netdata/var/log/netdata
- SQL:
- Username: netdata
- Password: *
- NOTE: No database required by netdata.
OpenLDAP → iRedMail LDAP Sync and Dovecot Authentication
Introduction
iRedMail brings already a very nice interface for management. The system is highly integrated and it includes an OpenLDAP server. Hence I already have a centralized OpenLDAP server I had the challenge to bring them somehow together. One way would have been to point iRedMail to the existing OpenLDAP server. The other way was to sync these two systems.
I decided to sync them, because I didn't want to bring any side effects or problems to this integrated system.
First I tried the syncrepl protocol that is provided by OpenLDAP. Syncrepl wouldn't do the job hence it synchronizes two OpenLDAP servers to the last bit, but I only need the mail users to be synced. So finally I decided to to do the sync with LDAP tools and bash scripting.
The Script
#!/bin/bash
#
# Sync users from another LDAP
#
# run in iRedMail-1.6.8/tools
#
. ../conf/global
. ../conf/core
#
# LDAP from which users will be synced (Source LDAP) fill in your data
#
urlAAI="ldaps://openldap.simmy.ch:636"
basednAAI="dc=simmy,dc=ch"
binddnAAI="cn=binduser,ou=Users,dc=simmy,dc=ch"
bindpwAAI="*"
#
# iRedMail LDAP (target LDAP) fill in your data
#
urlMAIL="ldap://mail.simmy.ch:389"
basednMAIL="o=domains,dc=simmy,dc=ch"
#binddnMAIL="cn=vmail,dc=simmy,dc=ch"
#bindpwMAIL="*"
binddnMAIL="cn=Manager,dc=simmy,dc=ch"
bindpwMAIL="*"
#
# common variables from iRedMail setup
#
STORAGE_BASE_DIRECTORY="/var/vmail/vmail1"
STORAGE_BASE="$(dirname ${STORAGE_BASE_DIRECTORY})"
STORAGE_NODE="$(basename ${STORAGE_BASE_DIRECTORY})"
#
# Search filter for groups on source LDAP server
s_filter="(&(|(objectclass=inetOrgPerson))(|(memberof= cn=hMail_Users,ou=Groups,dc=simmy,dc=ch)))"
#
# get users uid from Source LDAP (I here have parameter which distinguish
# different types of users(hrEduPersonPrimaryAffiliation=djelatnik) for employees in Source LDAP
#
ldapsearch -H ${urlAAI} -x -D "${binddnAAI}" -w "${bindpwAAI}" -b "${basednAAI}" "${s_filter}" "uid" > AAI.ldif
#
# process .ldif output so in one line is only users uid
#
# example: AAI.ldif contains ONLY users uid each in newline
# user1
# user2
# etc...
#
sed '/#/d' < AAI.ldif > newAAI.ldif; mv newAAI.ldif AAI.ldif
sed '/search:/d' < AAI.ldif > newAAI.ldif; mv newAAI.ldif AAI.ldif
sed '/result:/d' < AAI.ldif > newAAI.ldif; mv newAAI.ldif AAI.ldif
sed '/dn:/d' < AAI.ldif > newAAI.ldif; mv newAAI.ldif AAI.ldif
sed 's/uid: //' < AAI.ldif > newAAI.ldif; mv newAAI.ldif AAI.ldif
sed '/^$/d' < AAI.ldif > newAAI.ldif; mv newAAI.ldif AAI.ldif
#
# add users to array (each line in another member of array) and delete temporary file
#
declare -a AAIkorisnici
let i=0
while IFS=$'\n' read -r line_data; do
AAIkorisnici[i]="${line_data}"
((++i))
done < AAI.ldif
rm -f AAI.ldif
#
# PROCESSING USERS
#
let i=0
while (( ${#AAIkorisnici[@]} > i )); do
#
# check if user already in Target LDAP (already have mailbox)
#
checkuserMAIL=$(ldapsearch -x -H ${urlMAIL} -b "${basednMAIL}" -D "${binddnMAIL}" -w "${bindpwMAIL}" uid=${AAIkorisnici[i]} | grep uid: | awk '{print $1}')
if [ "${checkuserMAIL}" = 'uid:' ];
then
#
# user exist on Target LDAP ... so I will only synchronize password beetwen two LDAPs
#
printf "User ${AAIkorisnici[i]} already exists on mail server\n";
printf "Synchronize mail password on openldap.simmy.cha: ${AAIkorisnici[i]}\n";
ldapsearch -H ${urlAAI} -x -D "${binddnAAI}" -w "${bindpwAAI}" -b "${basednAAI}" uid=${AAIkorisnici[i]} "(hrEduPersonPrimaryAffiliation=djelatnik)" "uid" "userPassword" | perl -MMIME::Base64 -MEncode=decode -n -00 -e 's/\n +//g;s/(?<=:: )(\S+)/decode("UTF-8",decode_base64($1))/eg;binmode(STDOUT, ":utf8");print' > userAAIpwtoMAILpw.ldif
#
# put user data in variables and delete temporary file
#
userUID=$(grep uid: userAAIpwtoMAILpw.ldif | awk '{print $2}')
userPASSWORD=$(grep userPassword: userAAIpwtoMAILpw.ldif | awk '{print $2}')
userMAIL=${userUID}@hmail.simmy.org
rm -f userAAIpwtoMAILpw.ldif
ldapmodify -x -H ${urlMAIL} -D "${binddnMAIL}" -w "${bindpwMAIL}" <<EOF
dn: mail=${userMAIL},ou=Users,domainName=hmail.simmy.org,${basednMAIL}
changetype: modify
replace: userPassword
userPassword: ${userPASSWORD}
EOF
else
#
# user does not exist on Target LDAP so it will be added
#
printf "User does not exist on Target LDAP: ${AAIkorisnici[i]}\n";
printf "User will be added to mail server: ${AAIkorisnici[i]}\n";
#
# get user data ftom Source LDAP (in my case i need: givenName, sn, userPassword, uid)
#
ldapsearch -H ${urlAAI} -x -D "${binddnAAI}" -w "${bindpwAAI}" -b "${basednAAI}" uid=${AAIkorisnici[i]} "(hrEduPersonPrimaryAffiliation=djelatnik)" "givenName" "sn" "userPassword" "uid"| perl -MMIME::Base64 -MEncode=decode -n -00 -e 's/\n +//g;s/(?<=:: )(\S+)/decode("UTF-8",decode_base64($1))/eg;binmode(STDOUT, ":utf8");print' > userAAItoMAIL.ldif
#
# put user data in variables and delete temporary file
#
userUID=$(grep uid: userAAItoMAIL.ldif | awk '{print $2}')
userGIVENNAME=$(grep givenName: userAAItoMAIL.ldif | awk '{print $2}')
userSN=$(grep sn: userAAItoMAIL.ldif | awk '{print $2}')
userPASSWORD=$(grep userPassword: userAAItoMAIL.ldif | awk '{print $2}')
userMAIL=${userUID}@hmail.simmy.org
#maildir="$( hash_domain "hmail.simmy.org")/$( hash_maildir ${userUID} )"
maildir="/var/vmail/vmail1/hmail.simmy.org/$( hash_maildir ${userUID} )"
#/var/vmail/vmail1/hmail.simmy.org/n/e/o/neo-2024.03.29.18.25.30/
rm -f userAAItoMAIL.ldif
#
# and finaly create user on mailserver....
#
ldapadd -x -H ${urlMAIL} -D "${binddnMAIL}" -w "${bindpwMAIL}" <<EOF
dn: mail=${userMAIL},ou=Users,domainName=hmail.simmy.org,${basednMAIL}
objectClass: inetOrgPerson
objectClass: shadowAccount
objectClass: amavisAccount
objectClass: mailUser
objectClass: top
accountStatus: active
storageBaseDirectory: ${STORAGE_BASE}
homeDirectory: ${STORAGE_BASE_DIRECTORY}/${maildir}
mailMessageStore: ${STORAGE_NODE}/${maildir}
mail: ${userMAIL}
mailQuota: 1048576000
userPassword: ${userPASSWORD}
cn: ${userSN} ${userGIVENNAME}
sn: ${userSN}
givenName: ${userGIVENNAME}
uid: ${userUID}
shadowLastChange: 0
amavisLocal: TRUE
enabledService: internal
enabledService: doveadm
enabledService: lib-storage
enabledService: mail
enabledService: pop3
enabledService: pop3secured
enabledService: imap
enabledService: imapsecured
enabledService: managesieve
enabledService: managesievesecured
enabledService: sieve
enabledService: sievesecured
enabledService: smtp
enabledService: smtpsecured
enabledService: deliver
enabledService: lda
enabledService: forward
enabledService: senderbcc
enabledService: recipientbcc
enabledService: shadowaddress
enabledService: displayedInGlobalAddressBook
EOF
fi
((++i))
doneThe script is located in /root/iRedMail-1.6.8/tools and must be run from there. I basically found this script in an iRedMail forum.
First the scripts filters all users from cn=hMail_Users,ou=Groups,dc=simmy,dc=ch on the source LDAP server. Then the script checks if a user exists on iRedMail LDAP and if not, it creates the user. Otherwise only the password will be updated.
ldap.conf
Using the ldap client requires to configure /etc/ldap/ldap.conf. Furthermore every single certificate has to be inserted in this file. In this case the root ca of simmy.ch has to be inserted (line 4). Only after that, the LDAP client trust the certificate of the OpenLDAP source server.
BASE dc=simmy,dc=ch
URI ldap://127.0.0.1:389
TLS_CACERT /etc/ssl/certs/iRedMail.crt
TLS_CACERT /etc/ssl/certs/ca_simmy.ch.crtUseful links
https://www.openldap.org/doc/admin22/syncrepl.html
ToDo
Add a cronjob
Useful commands
ldapsearch -x -LLL -H ldaps://openldap.simmy.ch -d1 -ZZGoal
Bringing iRedMail/SOGo up to production quality is a very reasonable next step, and once that is done it can safely take over archiving and DAV while you de‑emphasize Proton for day‑to‑day mail. Given your skills, the main work is hardening, DNS/auth records, and clean DAV exposure.vocal
1. Security hardening basics
-
Make sure the OS and all iRedMail components (Postfix, Dovecot, iRedAdmin, Roundcube, SOGo) are fully updated, paying attention to recent iRedAdmin vulnerabilities like CVE‑2024‑47227.linode
-
Apply common iRedMail hardening steps: lock down admin URLs, restrict access to iRedAdmin/MySQL/phpMyAdmin to admin IPs/VPN, clean up default aliases/paths, enforce strong TLS configs and disable weak ciphers.iredmail
2. Mail hygiene and deliverability
-
Configure and verify SPF, DKIM, and DMARC for your domains; start with
p=nonefor DMARC and move top=rejectonce aligned, following current best practices (aligned DKIM domain, 2048‑bit keys, proper rua reporting).mailforge -
Monitor deliverability and abuse: log review, fail2ban rules, rate limiting, and regular checks for blacklisting are essential if you want to rely on this box for external mail, even if you initially use it mostly for monitoring and archiving.powerdmarc
3. SOGo as DAV/groupware front end
-
SOGo integrates cleanly with iRedMail and exposes CalDAV/CardDAV endpoints suitable for macOS/iOS/Thunderbird, giving you mail + calendar + address book on standard protocols without a proprietary suite.tribalchicken
-
Follow the iRedMail/SOGo docs for DAV URLs (
/SOGo/dav/your-full-email) and SSL‑only access, then test with macOS Contacts/Calendar and Thunderbird as your primary DAV clients.iredmail
4. Production readiness checklist
-
Network/SSL: Only 443/993/587 (and 25 as needed) exposed; A/AAAA, PTR, MX, and TLS are clean; ACME renewal is automatic.bjoern-hagedorn
-
Access separation:
-
Public: mail (IMAP/SMTP/submission), SOGo webmail/DAV.
-
Admin: iRedAdmin, DB admin, metrics only via VPN or management VLAN/IP allowlist.vocal
-
-
Backup/restore: Regular tested backups of maildirs, SQL/LDAP backends, and SOGo config; documented restore path so you can recover the service quickly.timothy-quinn