Linux Tips and Tricks
- Start / Stop /Restart BIND DNS Server
- Install network scanner on Archlinux
- Install xrdp on Fedora 42
- Install send mail service on Fedora
- Install send mail service on Debian
- Install xrdp on Fedora Xfce
- Add a user to the sudoers group on Debian 13
- Verify NFS export
Start / Stop /Restart BIND DNS Server
Introduction
For testing purposes I am using Univention with bind9. The greater goal is to use AD/SAMBA from Univention. After testing for a couple of weeks suddenly some DNS addresses do not get resolved. The same problems occurred on Zentyal.
So far I couldn't find a reason for this misbehavior. However, a restart of the bind9 service seems to patch the problem.
Debian based Linux
Start the service
service bind9 startStop the service
service bind9 stopRestart the service
service bind9 restartReload the service
This will become necessary of a configuration file is changed.
service bind9 reloadCheck status
service bind9 statusFedora based Linux
Start the service
systemctl start namedStop the service
systemctl stop namedRestart the service
systemctl restart namedCheck status
systemctl status namedInstall network scanner on Archlinux
Install the drivers with pamac
run the commandline:
sudo brsaneconfig4 -a name=Brother model=MFC-9330CDW ip=192.168.1.108check if it is working
scanimage -Ldevice `brother4:net1;dev0' is a Brother Brother MFC-9330CDW
device `v4l:/dev/video2' is a Noname Logitech BRIO virtual device
device `v4l:/dev/video0' is a Noname Logitech BRIO virtual devi
Install xrdp on Fedora 42
How to Set Up XRDP on Fedora 42 XFCE
Follow these steps for a reliable and quick XRDP setup with XFCE on Fedora 42:
- Install XRDP and XFCE (if not already installed)
sudo dnf install xrdp xorgxrdp
2. Enable and Start XRDP Service
sudo systemctl enable --now xrdp
3. Configure the Firewall
open Port 3389 for rdp
4. Set Up the XFCE Session for XRDP
Create a file named .Xclients in your home directory with the following content:
echo "xfce4-session" > ~/.Xclients
 echo "xfce4-session" > ~/.Xclients
 chmod +x ~/.Xclients
6. Restart XRDP Services
sudo systemctl restart xrdp
sudo systemctl restart xrdp-sesman
7. Connect via RDP
-
Use Devolutions RDM or any RDP client.
-
Enter your Fedora machine's IP address and credentials.
Summary Table
| Step | Command/Action |
|---|---|
| Install XRDP | sudo dnf install xrdp xorgxrdp |
| Enable & start service | sudo systemctl enable --now xrdp |
| Firewall open port | sudo firewall-cmd --permanent --add-port=3389/tcp; sudo firewall-cmd --reload |
| Configure session | echo "xfce4-session" > ~/.Xclients; chmod +x ~/.Xclients |
| (Optional) SELinux fix | sudo chcon --type=bin_t /usr/sbin/xrdp* |
| Restart XRDP | sudo systemctl restart xrdp xrdp-sesman |
This setup gives you a fast, graphical remote desktop on Fedora XFCE with minimal hassle.
Install send mail service on Fedora
Overview
This guide explains how to set up authenticated email sending from the command line on Fedora using msmtp (a lightweight SMTP client) and s-nail (a mailx-compatible mail utility). This method is ideal for scripts and system notifications in environments where only authenticated SMTP is allowed.
1. Install Required Packages
sudo dnf install -y msmtp s-nail2. Configure msmtp
- Copy the example configuration (optional):
sudo cp /usr/share/doc/msmtp/msmtprc-system.example /etc/msmtprc - Edit
/etc/msmtprcand adjust to your SMTP provider:sudo nano /etc/msmtprcExample configuration:
defaults auth on tls on tls_trust_file /etc/ssl/certs/ca-bundle.crt logfile /var/log/msmtp.log account default host mail.hosting.de port 587 from admin@simmy.org user admin@simmy.org password <super-secret> - Set permissions to protect your password:
sudo chmod 600 /etc/msmtprc
3. Configure s-nail to Use msmtp
Add the following line to /etc/s-nail.rc or your ~/.mailrc:
set mta=/usr/bin/msmtp4. Send a Test Email
echo "This is the body" | mail -s "Test Subject" recipient@example.com- If the command returns no errors, the mail was sent successfully.
- Check
/var/log/msmtp.logfor troubleshooting if needed.
5. Notes
- If you receive an error like "Authenticated user is not permitted to override sender address", ensure the
fromaddress in/etc/msmtprcmatches the authenticated SMTP user, or configure your SMTP provider to allow the desired sender address. - For use in scripts (e.g., backup notifications), simply use the
mailcommand as shown above.
References
- Sending e-mails via mailbox.org with msmtp on Fedora
- Fedora Docs: Mail Servers
- Fedora Forum: Sending mail with the (mailx) command
Install send mail service on Debian
Overview
This guide explains how to set up authenticated email sending from the command line on Debian-based systems (including Proxmox Backup Server) using msmtp (a lightweight SMTP client) and s-nail (a mailx-compatible utility). This is ideal for system notifications, backup/email scripts, and environments with DMARC/SPF filtering where authenticated sending is required.
1. Install Required Packages
apt update
apt install -y msmtp s-nail
2. Configure msmtp
- Create/Edit the global configuration file:
nano /etc/msmtprc - Example
/etc/msmtprc:defaults auth on tls on tls_trust_file /etc/ssl/certs/ca-certificates.crt logfile /var/log/msmtp.log syslog LOG_MAIL account default host mail.hosting.de port 587 from admin@simmy.org user admin@simmy.org password-
Important: "from" and "user" should match your authenticated email address for DMARC/SPF.
-
-
Example 2 /etc/msmtprc
-
syslog LOG_MAIL

defaults
auth on
tls off
tls_trust_file /etc/ssl/certs/ca-certificates.crt
logfile /var/log/msmtp.log

account ucs-backup
host ucs-backup.simmy.ch
port 25
from pbs01@simmy.ch
account default : ucs-backup
-
Use only plain ASCII spaces (no tabs or Unicode spaces).
-
- Set strict permissions:
chmod 600 /etc/msmtprc
3. Configure s-nail or mailx to use msmtp
Add the following line to your /etc/s-nail.rc (system-wide) or ~/.mailrc (per user):
set mta=/usr/bin/msmtp4. Send a Test Email
Use the mail command to test sending:
echo "This is the body" | mail -s "Test Subject" recipient@example.com On success, no output is shown. Check /var/log/msmtp.log or /var/log/mail.log (if syslog is enabled) for debug info if not delivered.
5. Troubleshooting
- If mail arrives in Junk/Spam, create a filter at your destination mailbox to whitelist the sender or move to Inbox.
- If you see an error like “account default was already
Install xrdp on Fedora Xfce
Overview
This document describes how to install and configure the XRDP server on Fedora 43 with the Xfce desktop environment so that Windows, macOS, and Guacamole clients can connect via RDP. Each Linux user who should be able to log in via XRDP needs their own startwm.sh to launch Xfce correctly.
Prerequisites
- Fedora 43 VM or physical host with the Xfce desktop environment installed (PRETTY_NAME="Fedora Linux 43 (Xfce)"). [web:14]
- Root or sudo access on the Fedora system.
- Network connectivity from RDP clients (Windows, macOS, Guacamole) to TCP port 3389 on the Fedora host.
Install and Enable XRDP
Install XRDP and its Xorg backend, then enable and start the service. Fedora 40/41 XRDP documentation uses the same pattern and works on Fedora 43. [web:21][web:17]
sudo dnf install -y xrdp xorgxrdp
sudo systemctl enable --now xrdp
sudo systemctl status xrdp
Open the Firewall for RDP
If firewalld is running, open TCP port 3389 permanently and reload the firewall rules. [web:21][web:17]
sudo firewall-cmd --permanent --add-port=3389/tcp
sudo firewall-cmd --reload
Create startwm.sh for Each User
On Fedora, XRDP uses a per-user startup script named startwm.sh in the user's home directory to start the desktop session. Fedora's XRDP guide shows this pattern for multiple desktops; for Xfce the command is dbus-launch --exit-with-session /usr/bin/startxfce4.
Repeat the following steps for each user account that should be able to log in via XRDP:
# as the target user (not root)
cat > ~/startwm.sh << 'EOF'
#!/bin/sh
export LANG=en_US.UTF-8
export LC_ALL=en_US.UTF-8
exec dbus-launch --exit-with-session /usr/bin/startxfce4
EOF

chmod 755 ~/startwm.sh
Explanation:
dbus-launch --exit-with-sessionensures a proper D-Bus session is created for Xfce, which is required for a fully functional desktop over XRDP./usr/bin/startxfce4starts the Xfce session.chmod 755makes the script executable so XRDP can run it at login.
Optional: Global /etc/xrdp/startwm.sh
If you want a single configuration for all users, you can copy the same script to /etc/xrdp/startwm.sh so XRDP uses it globally. This approach is also referenced in XRDP discussions about custom session commands.
sudo cp /home/<username>/startwm.sh /etc/xrdp/startwm.sh
sudo chmod 755 /etc/xrdp/startwm.sh
sudo systemctl restart xrdp
Replace <username> with a real user name when copying from an existing script.
SELinux Considerations (Optional)
On some Fedora installations, SELinux can interfere with XRDP. Recent XRDP-on-Fedora guides use chcon to assign the bin_t type to XRDP binaries if SELinux denials occur. [web:17]
sudo chcon --type=bin_t /usr/sbin/xrdp
sudo chcon --type=bin_t /usr/sbin/xrdp-sesman
sudo systemctl restart xrdp
Testing with a Native RDP Client
Test XRDP with a standard RDP client before integrating with Guacamole. Fedora XRDP documentation uses Windows Remote Desktop as the reference client. [web:21]
- From a Windows machine, open Remote Desktop Connection (
mstsc.exe). - Enter the Fedora host name or IP (for example
fedora-xfce.example.local) and connect. [web:21] - Log in using a Fedora user that has a
~/startwm.shconfigured. - Verify that an Xfce desktop session appears and is usable.
Using XRDP from Guacamole
Once XRDP and Xfce are working locally, Guacamole can connect using the RDP protocol. The key is to match the security mode and certificate options so that negotiation succeeds.
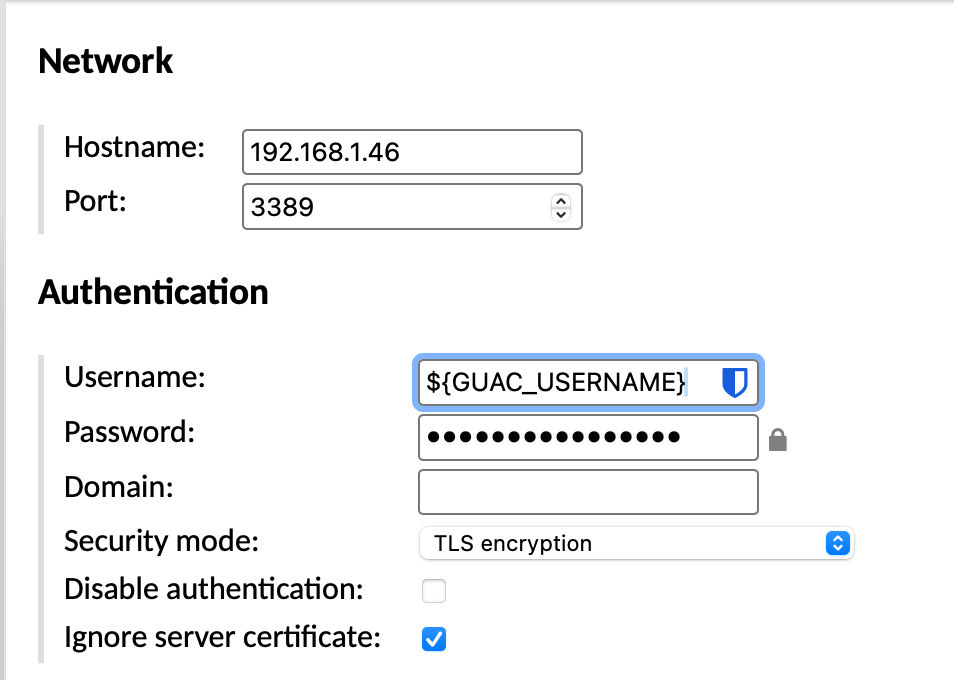
| Setting | Value |
| Protocol | RDP |
| Hostname | IP Address |
| Port | 3389 |
| Username | ${GUAC_USERNAME} |
| Password | ${GUAC_PASSWORD} |
| Security Mode | TLS |
| Ignore server certificate | enable |
Summary
- Install XRDP and Xorg backend with
dnf install -y xrdp xorgxrdp, then enable the service. - Open the firewall for TCP port 3389 if
firewalldis running. - Create a per-user
~/startwm.shcontainingdbus-launch --exit-with-session /usr/bin/startxfce4and make it executable. - Optionally, place the same script at
/etc/xrdp/startwm.shfor a global configuration. - Verify RDP access with a native client (e.g., Windows mstsc), then configure an RDP connection in Guacamole pointing at the Fedora 43 XRDP server.
Add a user to the sudoers group on Debian 13
usermod -aG sudo masterVerify NFS export
Check NFS exports on nas05.simmy.ch from the Linux:
sudo showmount -e nas05.simmy.ch