MacOS Tips & Tricks
- How to Disable SIP
- Boot into recovery mode
- MacOS - Flush DNS Cache
- MacOS - Privacy hint / OCSP patch
- Map a shared drive on MacOS
- Speedup Settings for 10 GbE
How to Disable SIP
Introduction
System Integrity Protection (SIP)
SIP protects MacOS from cyber attacks. However, it also prevents the installation of certain software. So it can become necessary to disable SIP temporarily.
Boot into recovery mode
Silicon M1, M2, M3
Shut down your Mac and wait for 20 seconds. Then, hold the power button until you see the "Loading startup options" message under the Apple logo. Then, select Options and click Continue to enter the macOS Recovery screen.
Intel based
Restart your Mac and wait for 30 seconds. Press the power button and immediately hold Command + R keys on the keyboard until you see the Apple logo. Your Mac will boot into macOS Recovery after a while.
Open a terminal
Under utilities, you will find "Terminal". Open it.Type the following command:
csrutil disableAfter that reboot the Mac, make all the necessary changes and enable SIP after that by entering the command:
csrutil enable
Boot into recovery mode
Intel based
Reboot and press:
- Command-R:
Start up from the built-in macOS Recovery System. Use this key combination to reinstall the latest macOS that was installed on your system, or to use the other apps in macOS Recovery. - Option-Command-R:
Start up from macOS Recovery over the internet. Use this key combination to reinstall macOS and upgrade to the latest version of macOS that’s compatible with your Mac. - Option-Shift-Command-R:
Start up from macOS Recovery over the internet. Use this key combination to reinstall the version of macOS that came with your Mac or the closest version that’s still available.
Silicon based
- Turn off your Mac.
- Press and hold the Power button.
- A message stating you'll be able to access startup options soon will appear. Keep holding the button down.
- Click Options > Continue to open up Recovery.
Useful Link
MacOS - Flush DNS Cache
Introduction
For some reasons Apple nurses a bug in the DNS resolver. This leads to the problem, that some FQDNs cannot be resolved correctly. The workaround is quite simple.
Resolution
sudo dscacheutil -flushcache
sudo killall -HUP mDNSResponder
MacOS - Privacy hint / OCSP patch
Introduction
The Online Certificate Status Protocol (OCSP) is an Internet protocol used for obtaining the revocation status of an X.509 digital certificate.It is described in RFC 6960 and is on the Internet standards track. It was created as an alternative to certificate revocation lists (CRL), specifically addressing certain problems associated with using CRLs in a public key infrastructure (PKI). Messages communicated via OCSP are encoded in ASN.1 and are usually communicated over HTTP. The "request/response" nature of these messages leads to OCSP servers being termed OCSP responders.
The OCSP protocol is used to check whether or not a certificate has been revoked. In this context, it is used to give Apple the opportunity to revoke the “blessing” it has given to a specific piece of software. Whenever you start an application, MacOS checks back with the OCSP server.
Resolution
There are two ways to prevent MacOS from checking back to Apple.
Local patch
echo 0.0.0.0 ocsp.apple.com | sudo tee -a /etc/hostsRouter patch
Discussion
In fact, Apple does not associate the information coming with this request to any person or any IP address. Apple does also not track, when you start an application. Apple could figure out, which software vendor an application is coming from (thinking about Microsoft, that leaves a lot of possibilities).
In the end, it is a simple check whether a certificate is valid or not.
Security professional criticized that a man in the middle attack is possible and you might start an application of which the certificate is revoked. The data itself is also transferred over HTTP without encryption. So a 3rd party could get an idea than somebody runs software from a specific software vendor.
Keeping aside the security concerns, it could be a little bit slower to start an application with a low bandwidth internet connection. In that case, it could make sense to block the request.
Useful links
https://www.sentinelone.com/blog/what-happened-to-my-mac-apples-ocsp-apocalypse/
Map a shared drive on MacOS
Introduction
Mapping of network drive seems to be a big issue. Hopefully this manual brings a little light into the fog.
Requirements
Any kind of network resource, that offers any kind of network share. A network resource can be:
- Windows Server
- Linux Server
- NAS (Network attaches storage)
- SMB or SAMBA
- CIFS
- NFS
- (FTP (SFTP))
- AFP (Apple File Protocol)
This manual will focus on SMB
Map a drive with MacOS and Finder
Open Finder and go to this menu or simply press cmd-k

Finder will provide you with a list of network resources it already found:
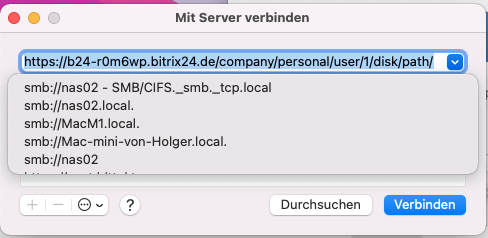
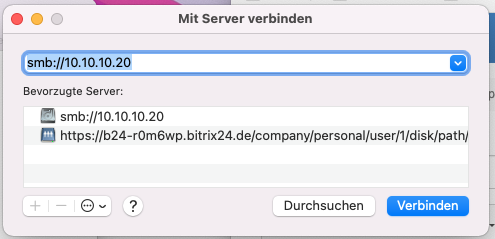
If you can already see your resource, you can click on it. If not, you will need to input the resource manually. You will need the protocol and ether the IP Address or an DNS name.
Finder understands these protocols:
- smb
- cifs (http, https)
- ftp
- afp
If our resource is located on nas01.simmy.ch and the protocol is smb, you will have to type in:
smb://nas01.simmy.ch

Most resources are protected with username and password:
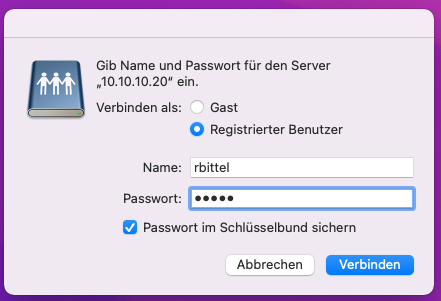
If you manage to enter your username and password correct, please select the resource, you want to access:

Next thing you will see is the data, that is located on the network share:

Speedup Settings for 10 GbE
Introduction
- SMB signing and encryption enabled by default on macOS, adding CPU and latency overhead to reads.
- Apple SMB extensions (AAPL / fruit) and Finder metadata lookups, which can severely hurt directory reads and some sequential patterns.
- macOS SMB client defaults in /etc/nsmb.conf not optimized for high‑bandwidth, wired 10 GbE connections.
Quick fix
On macOS 15.6.1 (run with sudo ), create or edit /etc/nsmb.conf :
[default]
signing_required=no
mc_on=yes
mc_prefer_wired=yes
protocol_vers_map=6
smb_neg=smb3_only
dir_cache_off=yes