Install PVE-VDIClient on Arch Linux
Introduction
This VDI client connects directly to Proxmox VE and allows users to connect (via Spice) to any VMs they have permission to access.
Installation
Install this first:
python3-pip python3-tk virt-viewer git
sudo pacman -S python tk virt-viewer git
git clone https://github.com/joshpatten/PVE-VDIClient.git
cd ./PVE-VDIClient/
chmod +x requirements.sh
./requirements.sh
sudo cp vdiclient.py /usr/local/bin
sudo chmod +x /usr/local/bin/vdiclient.py
cp vdiicon.ico ~/icons/
Configuration
On the client
~/.config/VDIClient/vdiclient.ini
[General]
# This is the title that is diplayed to the user
title = VDI Login
# This is the PySimpleGui Theme that is used. Run vdiclient.py with flag `--list_themes` for a list of themes
theme = LightBlue
# Program Icon
icon = vdiicon.ico
# Logo displayed on all windows
logo = vdiclient.png
# Enable Kiosk mode, which does not allow the user to close anything
kiosk = False
# Enable/Disable Fullscreen mode (not applicable in Kiosk mode)
fullscreen = False
# Disable viewer_kiosk mode if kiosk is set to true, this allows overriding remote_viewer kiosk mode
#viewer_kiosk = False
# Enable displaying SPICE ini file before opening virt-viewer
inidebug = False
# Select which guest types to display. Acceptable values: both, lxc, qemu
guest_type = both
# Show VM option for resetting VM
#show_reset = True
# Set Window Dimensions. Only use if window isn't sizing properly
#window_width = 800
#window_height = 600
# PVE-VDIClient supports multiple clusters. Define them with sections that start with Hosts. followed by the name
# you wish to display to your end users. This example is Hosts.PVE which would display PVE to your users
[Hosts.PVE]
# JSON dictionary of servers in the cluster
# Format is 'IP/FQDN': PORT
# NOTE: MAKE SURE THAT ALL LINES ARE INDENTED
hostpool = {
"pve01.simmy.ch" : 8006,
"pve02.simmy.ch" : 8006
}
# This is the authentication backend that will be used to authenticate
auth_backend = pve
# If enabled, 2FA TOTP entry dialog will show
auth_totp = false
# If disabled, TLS certificate will not be checked
tls_verify = false
# User name (if using token)
# NOTE: If only one cluster is defined, this will auto-login
# If user, token_name, and token_value are set
#user = user
# API Token Name
#token_name = dvi
# API Token Value
#token_value = xxx-x-x-x-xxx
# Password Reset Command Launch. Has to be full executable Command
#pwresetcmd = start chrome --app=http://pwreset.example.com
# Automatically connect to a VMID upon authentication
#auto_vmid = 100
# An additional cluster definition
#[Hosts.PVE2]
# JSON dictionary of servers in the cluster
# Format is 'IP/FQDN': PORT
#hostpool = {
# "10.10.10.100" : 8006,
# "10.10.10.111" : 8006,
# "pve1.example.com" : 8006
# }
# This is the authentication backend that will be used to authenticate
#auth_backend = pve
# If enabled, 2FA TOTP entry dialog will show
#auth_totp = false
# If disabled, TLS certificate will not be checked
#tls_verify = false
# User name (if using token)
# NOTE: If only one cluster is defined, this will auto-login
#user = user
# API Token Name
#token_name = dvi
# API Token Value
#token_value = xxx-x-x-x-xxx
# Password Reset Command Launch. Has to be full executable Command
#pwresetcmd = start chrome --app=http://pwreset.example.com
# Automatically connect to a VMID upon authentication
#auto_vmid = 100
[SpiceProxyRedirect]
# The Spice Proxy provided by the Proxmox API may need to have its host/port rewritten
# These rewrite rules are written `IP:port = IP:port`
# 1. Use the inidebug and read the current proxy=pve1.example.com:3128
# 2. Add your proxmox ip to the right side e.g. 123.123.123.123:6000
pve1.example.com:3128 = 192.168.1.99:6000
#[AdditionalParameters]
# If you wish to define additional parameters to pass to virt-viewer you may define them here
# More parameter definitions here: https://www.mankier.com/1/remote-viewer
# Some Examples:
# Enable USB passthrough
#enable-usbredir = true
# Enable auto USB device sharing
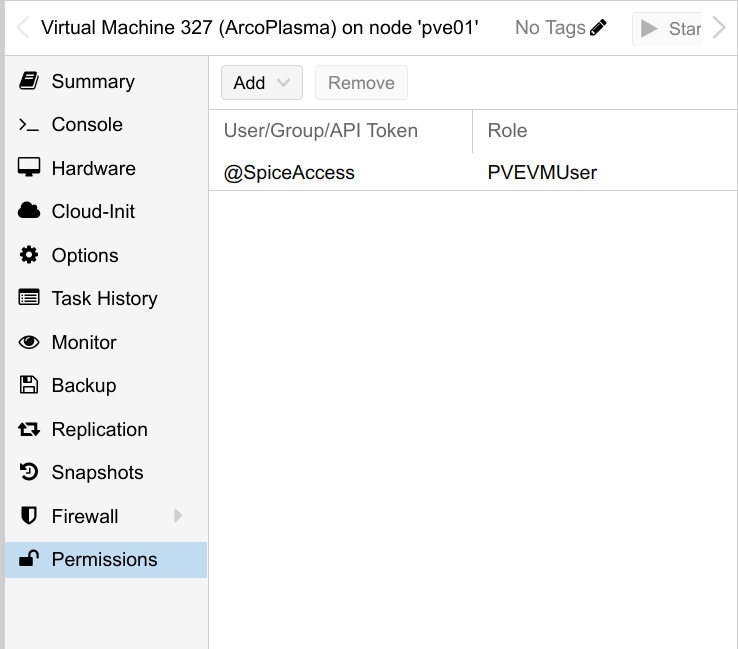
#enable-usb-autoshare = trueOn the Proxmox VE server
- Create a user (e.g. pvi) in the realm Proxmox VE authentication server
- Create a group (e.g. Spice Access)
- Add the group to permissions of all SPICE enabled virtual machines
- Add the role PVEVMUser

Licensing
In case there is a warning about Licensing or trial period, you can enter your license key into this file:
~/.config/PySimpleGUI/settings/_PySimpleGUI_settings_global_.json
{"-temp2-": 31082748, "-LICENSE KEY-": "egyhJ1MnawWiNflobjnzN7lSVpHQlbwwZGSvIi6FIjkxR3l9dnmhVpsybz3JBKlgcMibIeslIJkSxmpPYb2BVVuMcV22V6JVRrCsIc6QMITNciyMNpDRQrzyMXzGAVwnOsCPwUi8TyG9lfj7ZPWU5qzuZpUSRllOcdGvx9vneDW21MlyblnkRXWOZgXDJUzgaNWA9Nu2IJjcoSxKLiCIJpObYAWE12laRumblByOck3ZQYiFOQisJdIrbc2bxMn6ZsXWI6iULRC4JDOhY6Wu1IlmThGvFmzWdiCXI36WI7l4N1jcazG8luupZbG8xKlKcOiOIQsmIrkKNYvRbAXtBPh5bSn3kHi6Oli3IfiULOCFJwDddVXoNT0PbQ2b1Yl2c2kBlDERIfj9oliZM8zkUj1YOQDuMeiNLPCgJPEJYnXNRulESeX6NtzcdKWkVgkMIrjvoYigMWDEgxvnMKjrMHvnM2jqAsyWNDCtIoskIhkYRFh3dLGNVzFAetHSBVpvcam6VkzbIgjQofiGMFDPg3vPMmjpMOvnMgjWA5yQNGSKIrsjIxktVOt8YHW6lqsvQnWyRHkCcSmdV1zIcZyYI56LIYmmgGuSc62AN4o3axWM5mkTbPGOVpy7QGH4BvyObp3iR9vxbOmZ1LhwaIWHwsuDYE2egEi8LmC9JoJEU4EDF0k8ZNHjJLlUcy39MdizOHiSI44TN5S04SxjODTDUMurMEjBIw5HLvjZQhyeIpnN0u=9733ae7aa77212d35ae97ed325e69a9c0312af879bbac5a6c389d1873619b5313d3d32322e397b013ac43265bdb0d19b7df45c9157a6d7552fb5591b6aef5d42ef48fd5424265a1e0e849562dbdecd12dfd6c7cbb06fd9e1a7dbc51e63716e69c978ca072cc2a331c2cb052198431513cfa57e240d98e6cb0aa665ad0ec7db0ff287cd411666fa5134e064b34611674246dc4a3db98c8b3501a388f3812e4c63adf046a9eab973b76077bbb67bd874499f59f5801b37b795ab9cdf0d87b549cd02cbc6794ad2a3a71ad3f9833c76fa0e760b0f950c7e06a9d4beb299d22c41f33cf346af4c9219de9ea396268f67a6adc22ac97931a742841b591f63e816bf9891205e18d4ad8dedf1e7b43c76bab43ac99e77e28476746b1400d6b6ea06c9c26464b922f858c3ff0b9a9b4bbb49831cd7db5729570d05e1ffcc6fb8635108d60337c74ad81154b003d567b7a8fb5d098d0296e3ab9925f71c442676c697930856642d68a4132d4156226466402f057637933319b1906df45679665d18cfbdcf06a6bb4b9188134f18a71e9605fc4697bd5de6340f824693e18de579155294b7e4606b305c90cbfd82bb9298a9b01237deee29bb3a0c51cd20e0ba4622954724165a36a2f3fe9ea1c4c64f90c6c5ba6e2cbdbcbff782a0e63c758e58f0d300274a9c4b6d5384b31968e294f4117ce898864c622245a50d0772882cedba63aa00f", "-temp1-": "67707579", "-trial period warned-": false}
No comments to display
No comments to display